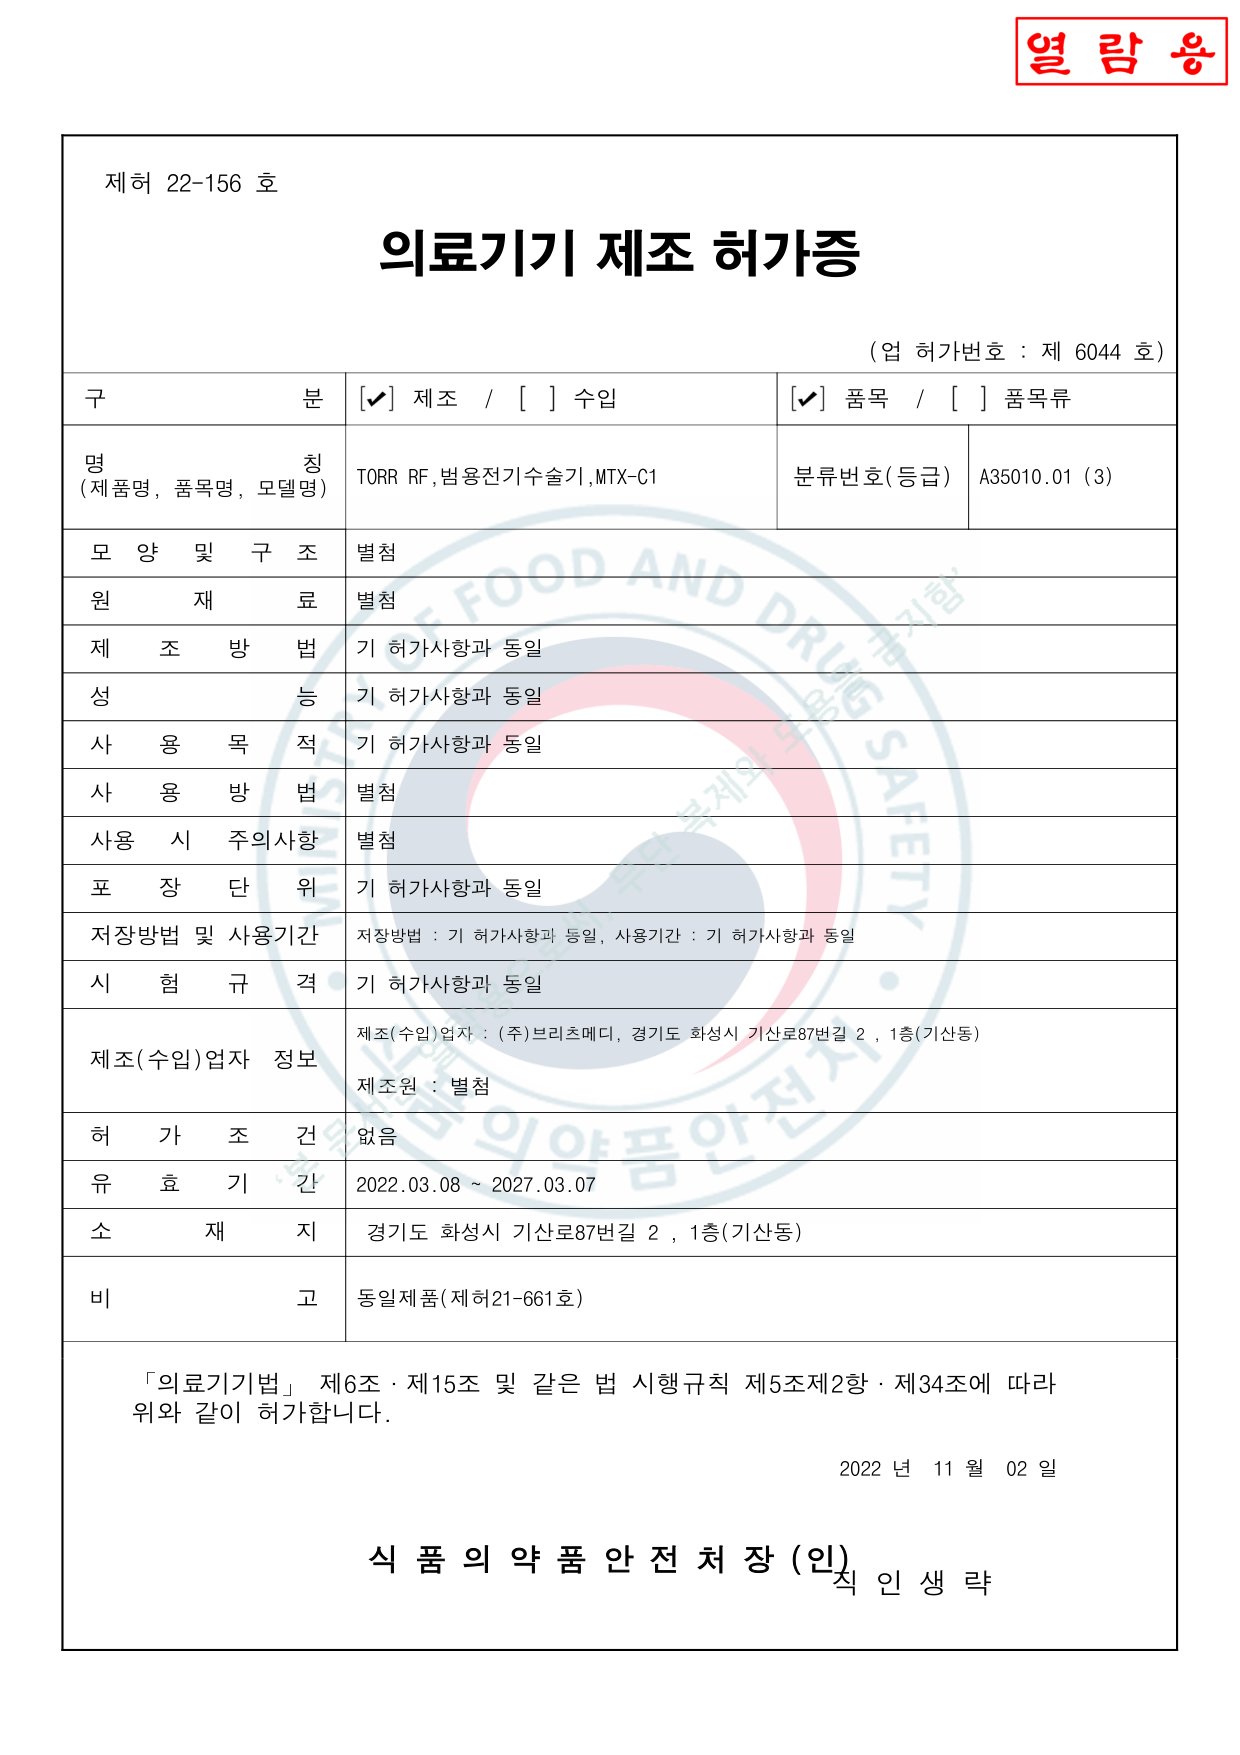
Manufacturing License Certificate의료기기 제조허가증
Change History변경 및 처분 사항
| Date년 월 일 | Description내용 |
|---|---|
| 2022-03-08 | Initial license approval최초허가 |
| 2022-11-02 | Precautions updated (power switch change: Key switch → Push switch)사용시 주의사항 (전원스위치 변경으로 인한 내용 반영 — Key 스위치 → push 스위치) |
| 2022-11-02 | Usage instructions updated (power switch change: Key → Push)사용방법 (전원스위치 변경으로 인한 내용 반영 — Key 스위치 → push 스위치) |
| 2022-11-02 | Raw materials updated (power switch change: Key → Push)원재료 (전원스위치 변경으로 인한 내용 반영 — Key 스위치 → push 스위치) |
| 2022-11-02 | Exterior design updated (power switch change: Key → Push)모양및구조-외형 (전원스위치 변경으로 인한 내용 반영 — Key 스위치 → push 스위치) |
Working Principle작용원리
This product consists of a main unit, 3 types of handpieces, a handpiece holder, and a foot switch.본 제품은 본체, 핸드피스 3종, 핸드피스 홀더, 풋 스위치로 구성된 장비입니다.
When output values are set on the LCD monitor, radio-frequency (RF) current is generated from inside the device and delivered to the body through the handpiece electrodes.LCD 모니터에서 출력값을 설정하면 장비 내부로부터 고주파 전류가 발생하고 핸드피스의 전극을 통해 인체에 전달됩니다.
The device utilizes the principle of coagulating tissue using heat generated by the body's impedance and contact resistance.인체의 부하나 접촉 저항에 의해 발생하는 열을 이용하여 조직을 응고시키는 원리를 이용합니다.
Exterior Design외형
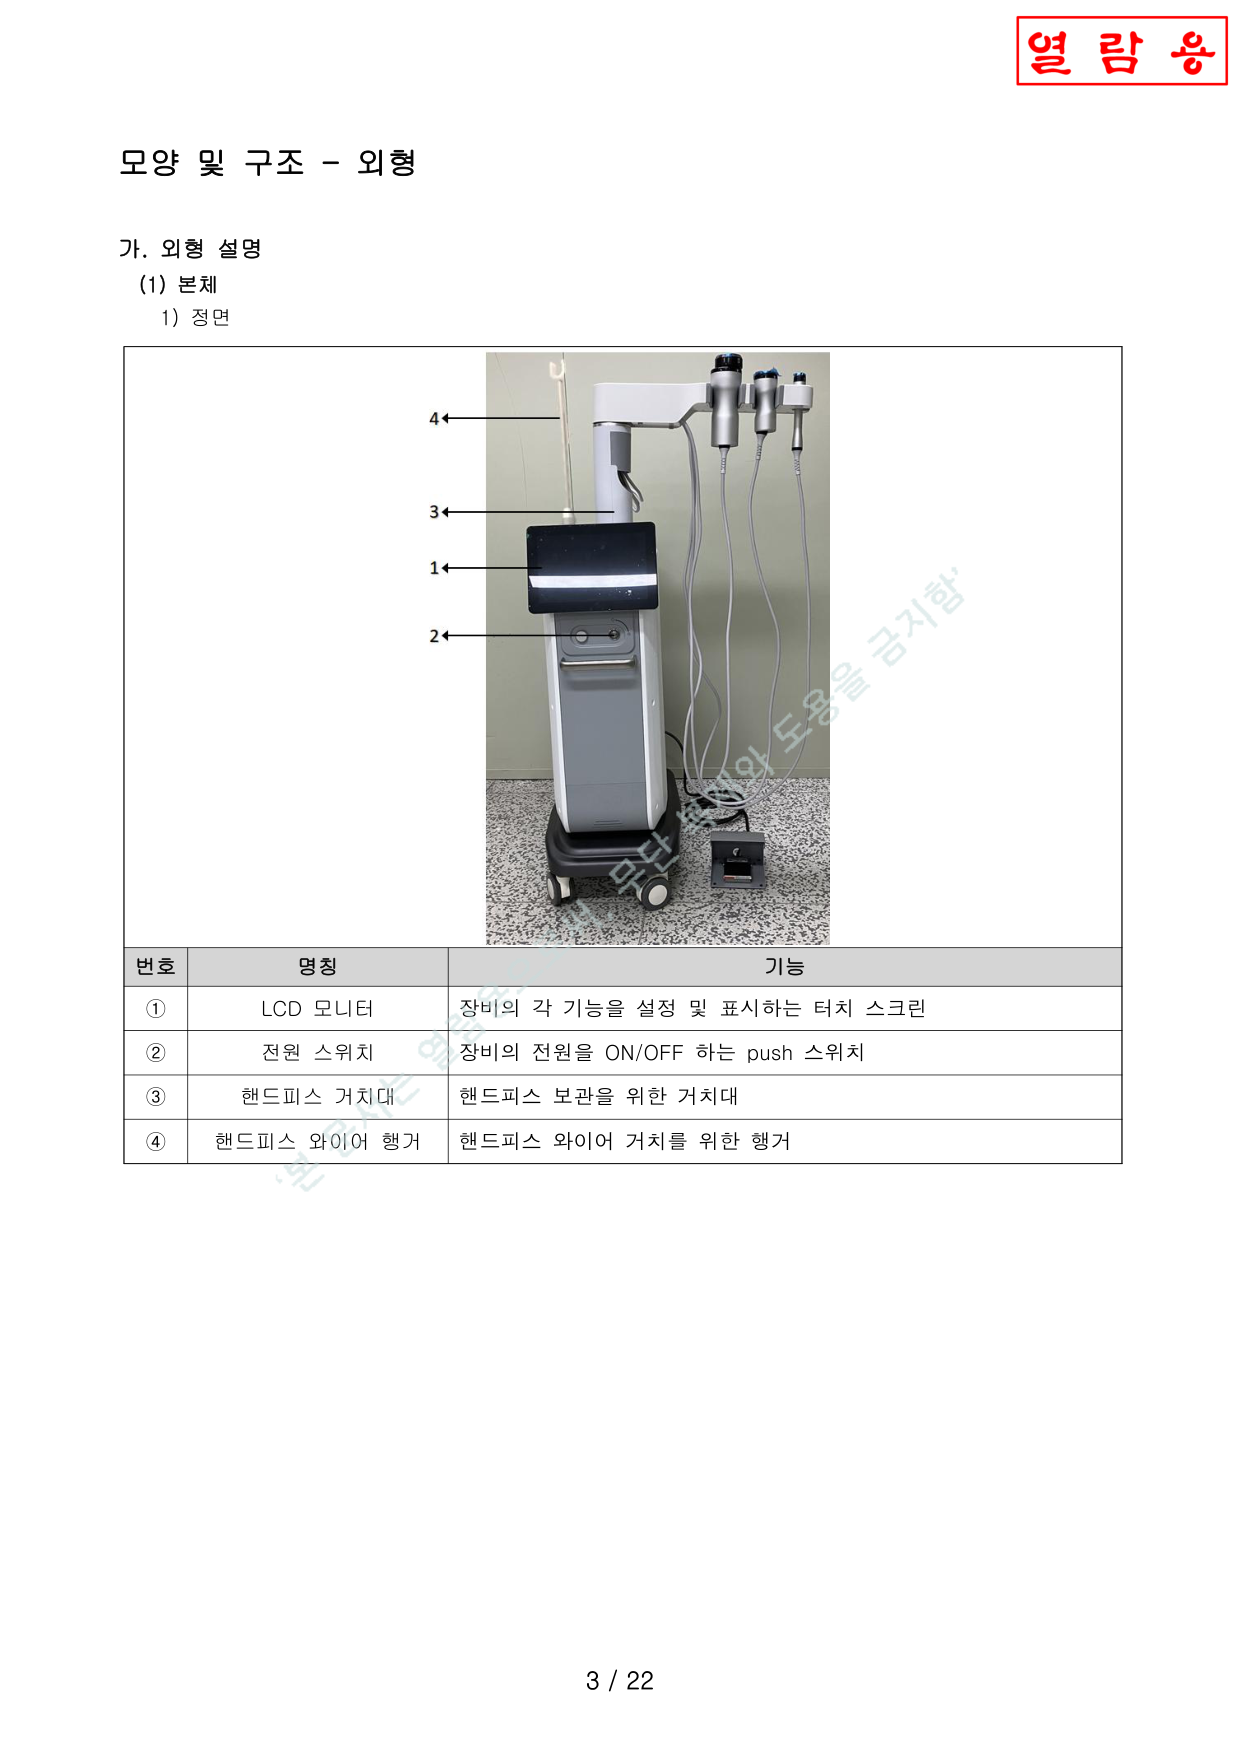
Front Panel정면
| No. | Name명칭 | Function기능 |
|---|---|---|
| ① | LCD MonitorLCD 모니터 | Touch screen for setting and displaying device functions각 기능을 설정 및 표시하는 터치 스크린 |
| ② | Power Switch전원 스위치 | Push switch to turn device power ON/OFF전원 ON/OFF push 스위치 |
| ③ | Handpiece Holder핸드피스 거치대 | Holder for handpiece storage핸드피스 보관용 거치대 |
| ④ | Wire Hanger와이어 행거 | Hanger for handpiece wire management핸드피스 와이어 거치용 행거 |
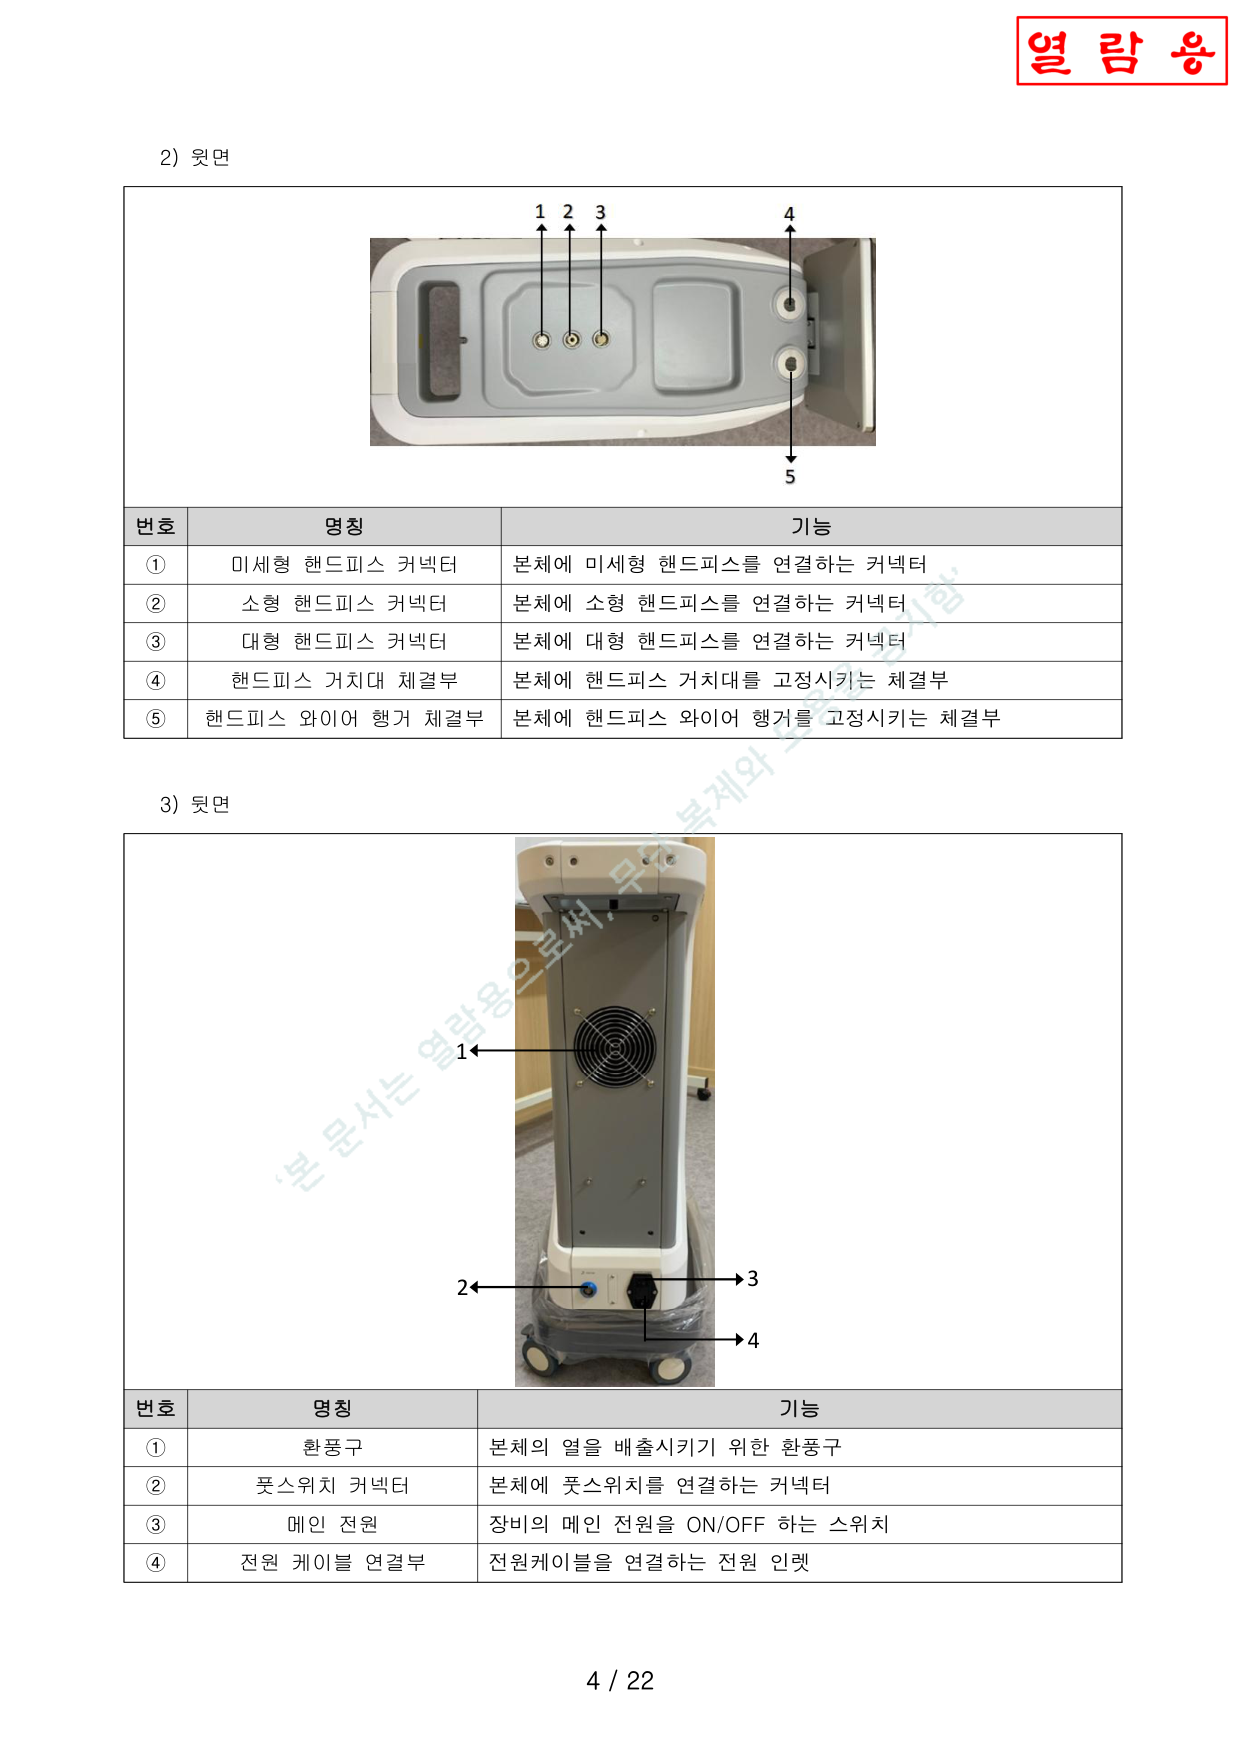
Top Panel윗면
| No. | Name명칭 | Function기능 |
|---|---|---|
| ① | Periorbital HP Connector미세형 HP 커넥터 | Connector for periorbital handpiece미세형 핸드피스 연결 |
| ② | Facial HP Connector소형 HP 커넥터 | Connector for facial handpiece소형 핸드피스 연결 |
| ③ | Body HP Connector대형 HP 커넥터 | Connector for body handpiece대형 핸드피스 연결 |
| ④ | Holder Mount거치대 체결부 | Mount for handpiece holder핸드피스 거치대 고정 |
| ⑤ | Hanger Mount행거 체결부 | Mount for wire hanger와이어 행거 고정 |
Rear Panel뒷면
| No. | Name명칭 | Function기능 |
|---|---|---|
| ① | Ventilation Port환풍구 | Heat dissipation vent본체 열 배출 |
| ② | Foot Switch Connector풋스위치 커넥터 | Connector for foot switch풋스위치 연결 |
| ③ | Main Power Switch메인 전원 | Main power ON/OFF switch메인 전원 ON/OFF |
| ④ | Power Cable Inlet전원 케이블 연결부 | Power inlet for cable connection전원 인렛 |
Components (Handpieces)구성품 (핸드피스)
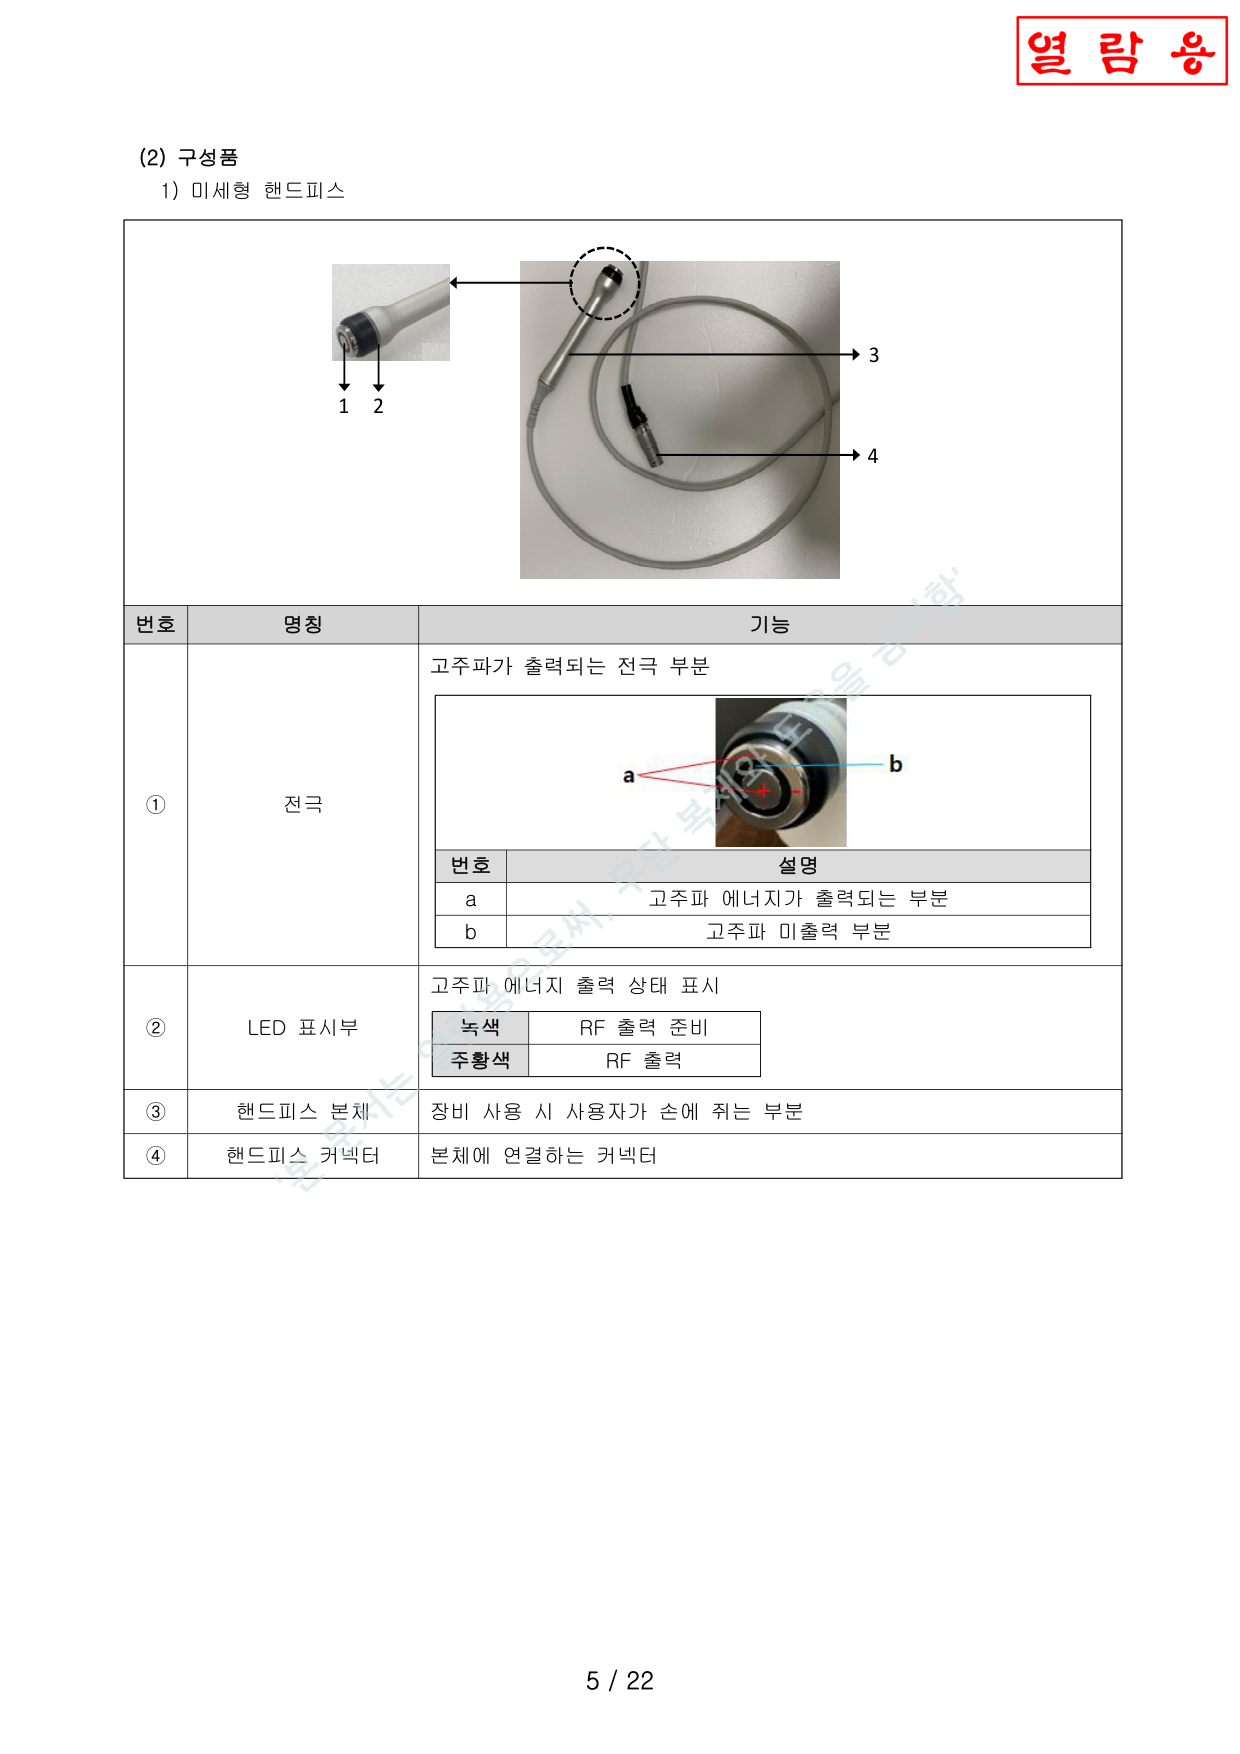
1. Periorbital Handpiece (Φ25mm)1. 미세형 핸드피스 (Φ25mm)
| No. | Name명칭 | Function기능 |
|---|---|---|
| ① | Electrode전극 | (a) RF active area, (b) RF inactive area(a) 고주파 출력 부분, (b) 미출력 부분 |
| ② | LED | Green = Ready, Orange = Active녹색 = 준비, 주황색 = 출력 |
| ③ | Body본체 | Grip portion손에 쥐는 부분 |
| ④ | Connector커넥터 | Connects to main unit본체에 연결 |
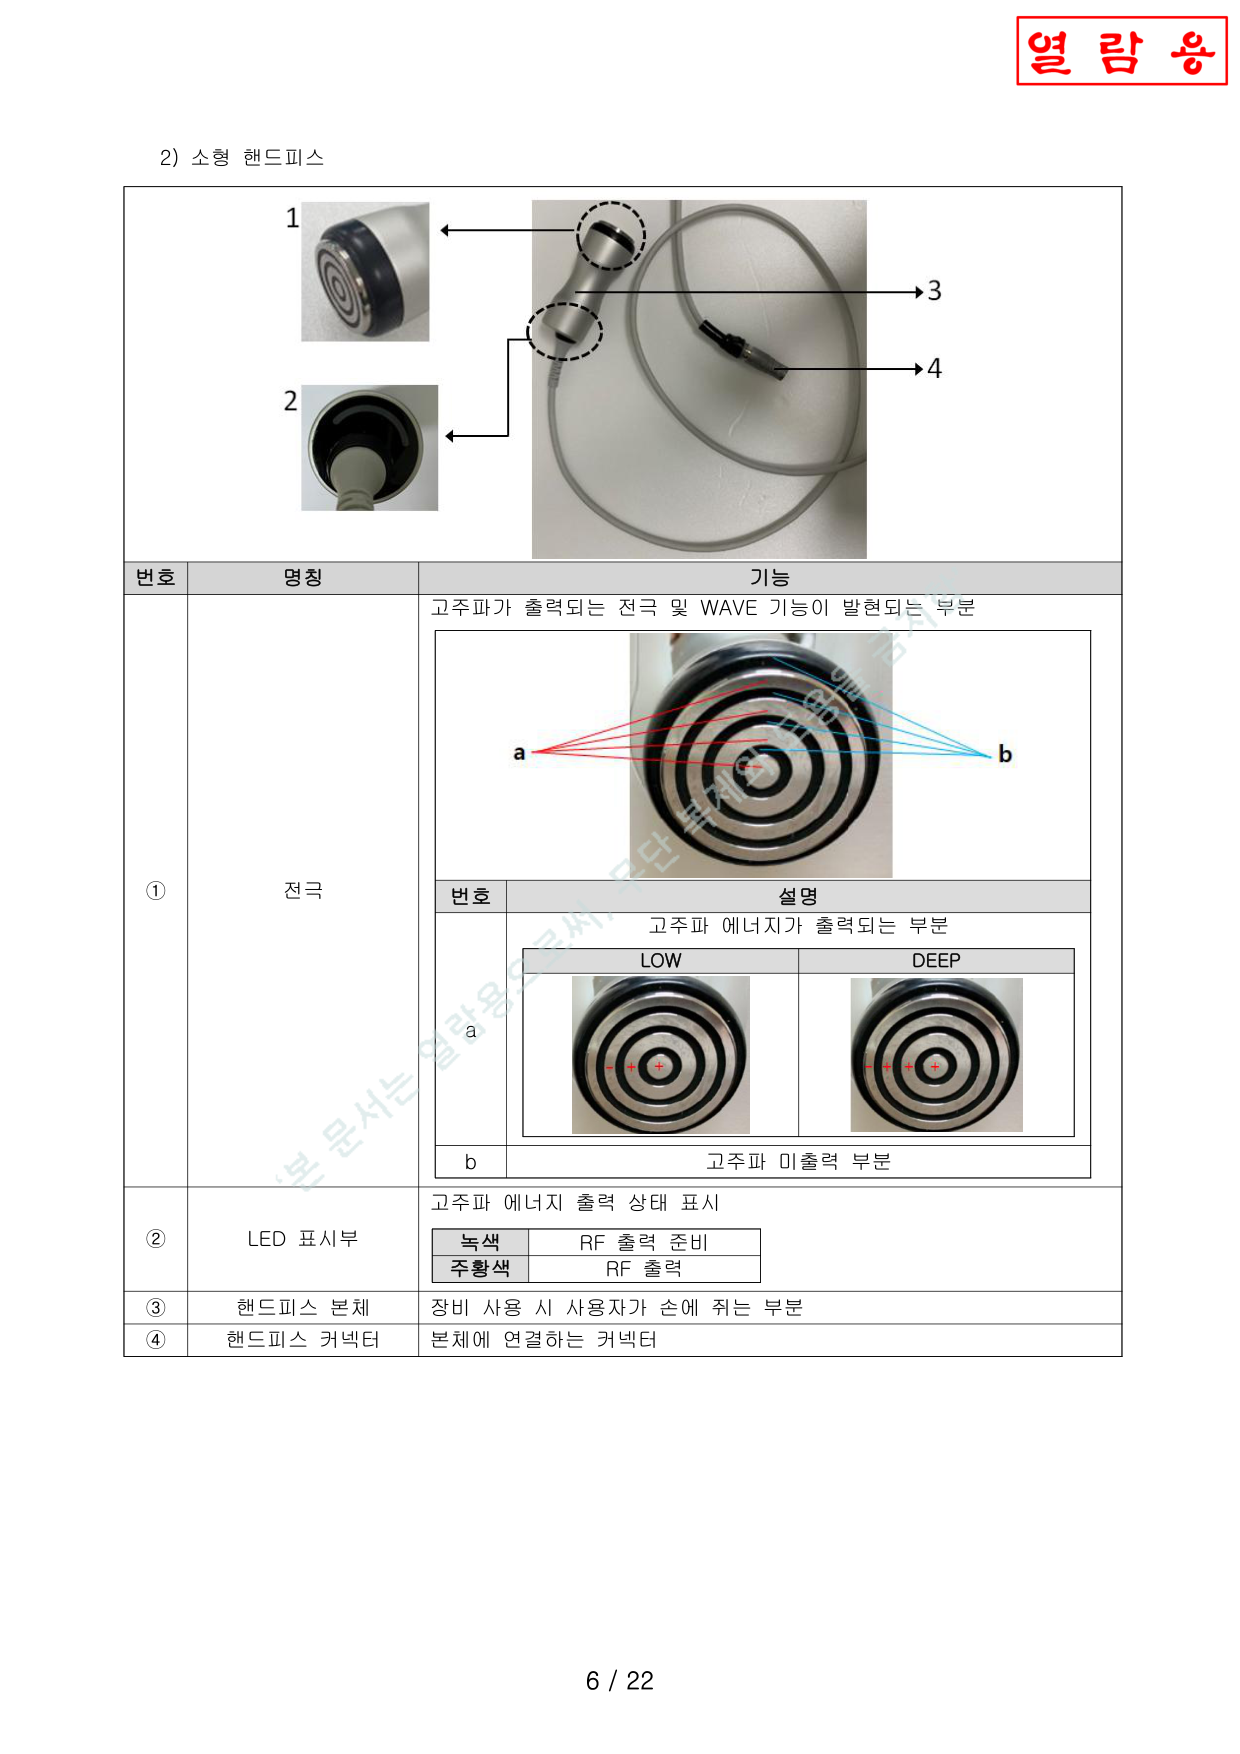
2. Facial Handpiece (Φ48mm)2. 소형 핸드피스 (Φ48mm)
| No. | Name명칭 | Function기능 |
|---|---|---|
| ① | Electrode전극 | RF output + WAVE function. (a) RF active (LOW/DEEP), (b) RF inactive고주파 출력 + WAVE 기능. (a) 출력(LOW/DEEP), (b) 미출력 |
| ② | LED | Green = Ready, Orange = Active녹색 = 준비, 주황색 = 출력 |
| ③ | Body본체 | Grip portion손에 쥐는 부분 |
| ④ | Connector커넥터 | Connects to main unit본체에 연결 |

3. Body Handpiece (Φ56mm)3. 대형 핸드피스 (Φ56mm)
| No. | Name명칭 | Function기능 |
|---|---|---|
| ① | Electrode전극 | RF + WAVE + MOTION. (a) RF active (LOW/DEEP), (b) inactive, (c) clockwise rotation when MOTION active고주파 + WAVE + MOTION. (a) 출력(LOW/DEEP), (b) 미출력, (c) MOTION 시 시계방향 회전 |
| ② | LED | Green = Ready, Orange = Active녹색 = 준비, 주황색 = 출력 |
| ③ | Body본체 | Grip portion손에 쥐는 부분 |
| ④ | Connector커넥터 | Connects to main unit본체에 연결 |
Accessories기타 구성품
| Power Cable전원 케이블 | Power supply cable장비 전원 공급용 |
| Foot Switch풋스위치 | Controls energy output에너지 출력 제어 |
Operation Screens조작화면
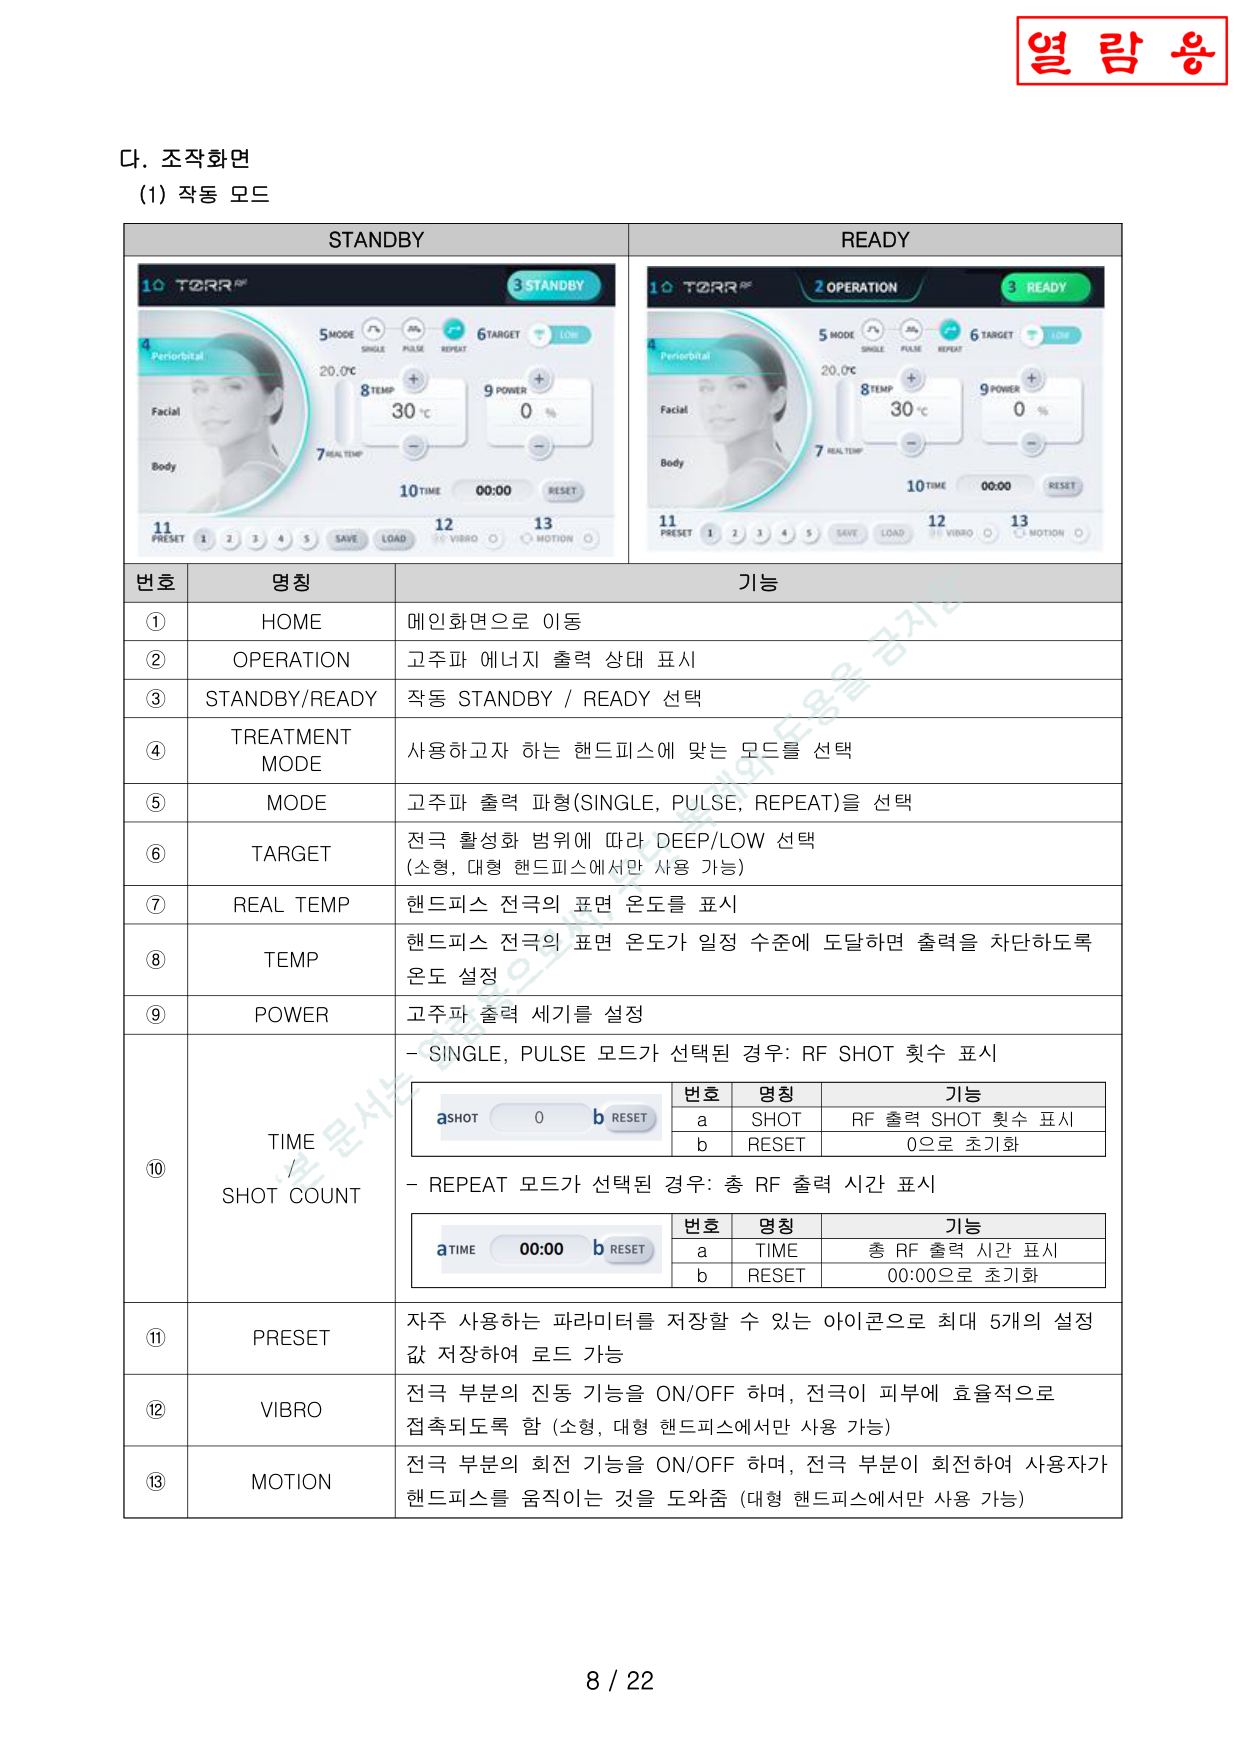
Operation Mode (STANDBY / READY)작동 모드 (STANDBY / READY)
| No. | Name명칭 | Function기능 |
|---|---|---|
| ① | HOME | Navigate to main screen메인화면으로 이동 |
| ② | OPERATION | RF energy output status indicator고주파 에너지 출력 상태 표시 |
| ③ | STANDBY / READY | Toggle between standby and readySTANDBY / READY 전환 |
| ④ | TREATMENT MODE | Select mode for handpiece in use핸드피스별 모드 선택 |
| ⑤ | MODE | RF waveform: SINGLE / PULSE / REPEAT고주파 파형: SINGLE / PULSE / REPEAT |
| ⑥ | TARGET | Electrode range: DEEP / LOW (Facial & Body only)전극 활성화: DEEP / LOW (소형, 대형만) |
| ⑦ | REAL TEMP | Real-time electrode surface temperature전극 표면 온도 실시간 표시 |
| ⑧ | TEMP | Set auto-cutoff temperature threshold출력 차단 온도 설정 |
| ⑨ | POWER | Set RF output power level고주파 출력 세기 설정 |
| ⑩ | TIME / SHOT | SINGLE/PULSE: shot count. REPEAT: total timeSINGLE/PULSE: SHOT 횟수, REPEAT: 출력 시간 |
| ⑪ | PRESET | Save/load up to 5 parameter sets파라미터 5개까지 저장/로드 |
| ⑫ | VIBRO | Electrode vibration ON/OFF (Facial & Body only)전극 진동 ON/OFF (소형, 대형만) |
| ⑬ | MOTION | Electrode rotation ON/OFF (Body only)전극 회전 ON/OFF (대형만) |
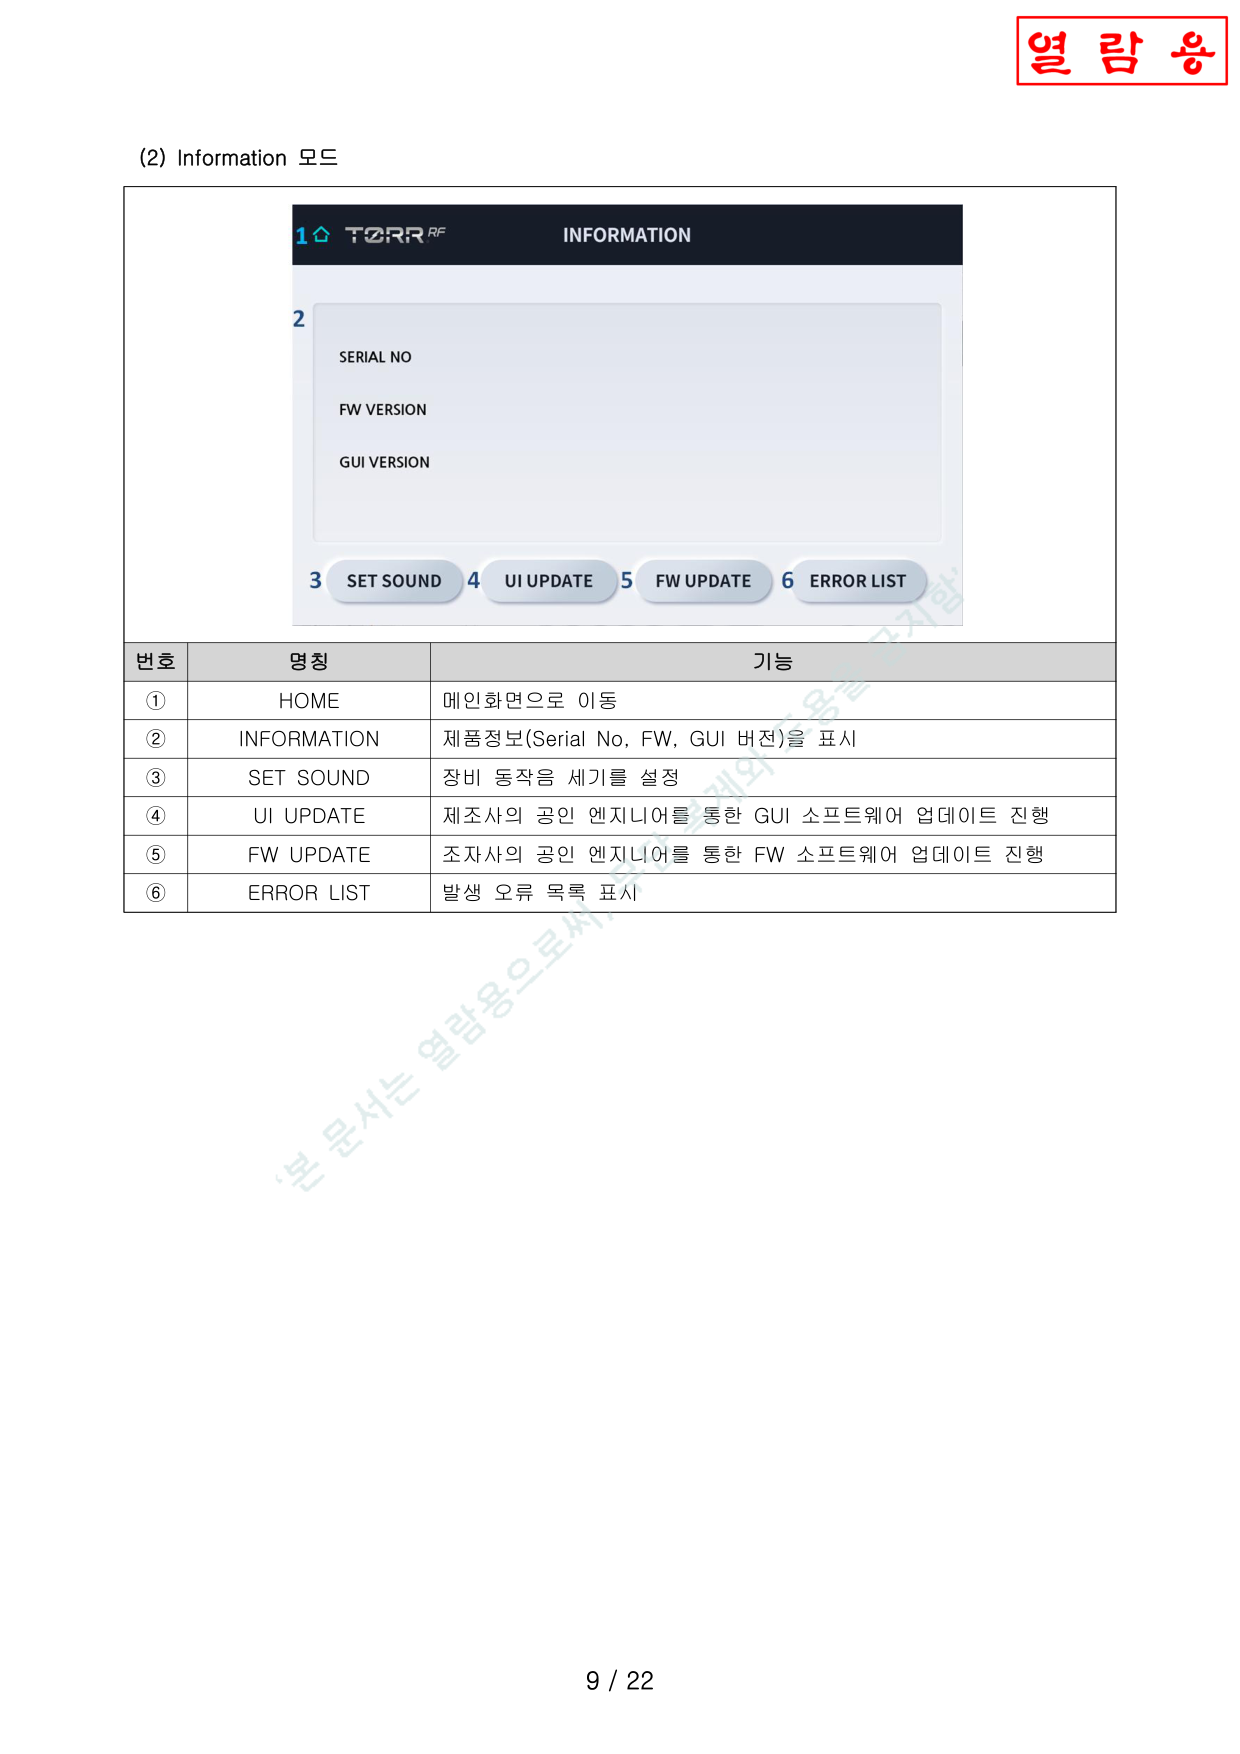
Information Mode
| No. | Name명칭 | Function기능 |
|---|---|---|
| ① | HOME | Main screen메인화면 |
| ② | INFORMATION | Serial No., FW & GUI versionSerial No, FW, GUI 버전 표시 |
| ③ | SET SOUND | Adjust operation sound volume동작음 세기 설정 |
| ④ | UI UPDATE | GUI update (authorized engineer only)GUI 업데이트 (공인 엔지니어 전용) |
| ⑤ | FW UPDATE | Firmware update (authorized engineer only)FW 업데이트 (공인 엔지니어 전용) |
| ⑥ | ERROR LIST | Display error log오류 목록 표시 |
Dimensions & Weight치수 및 중량
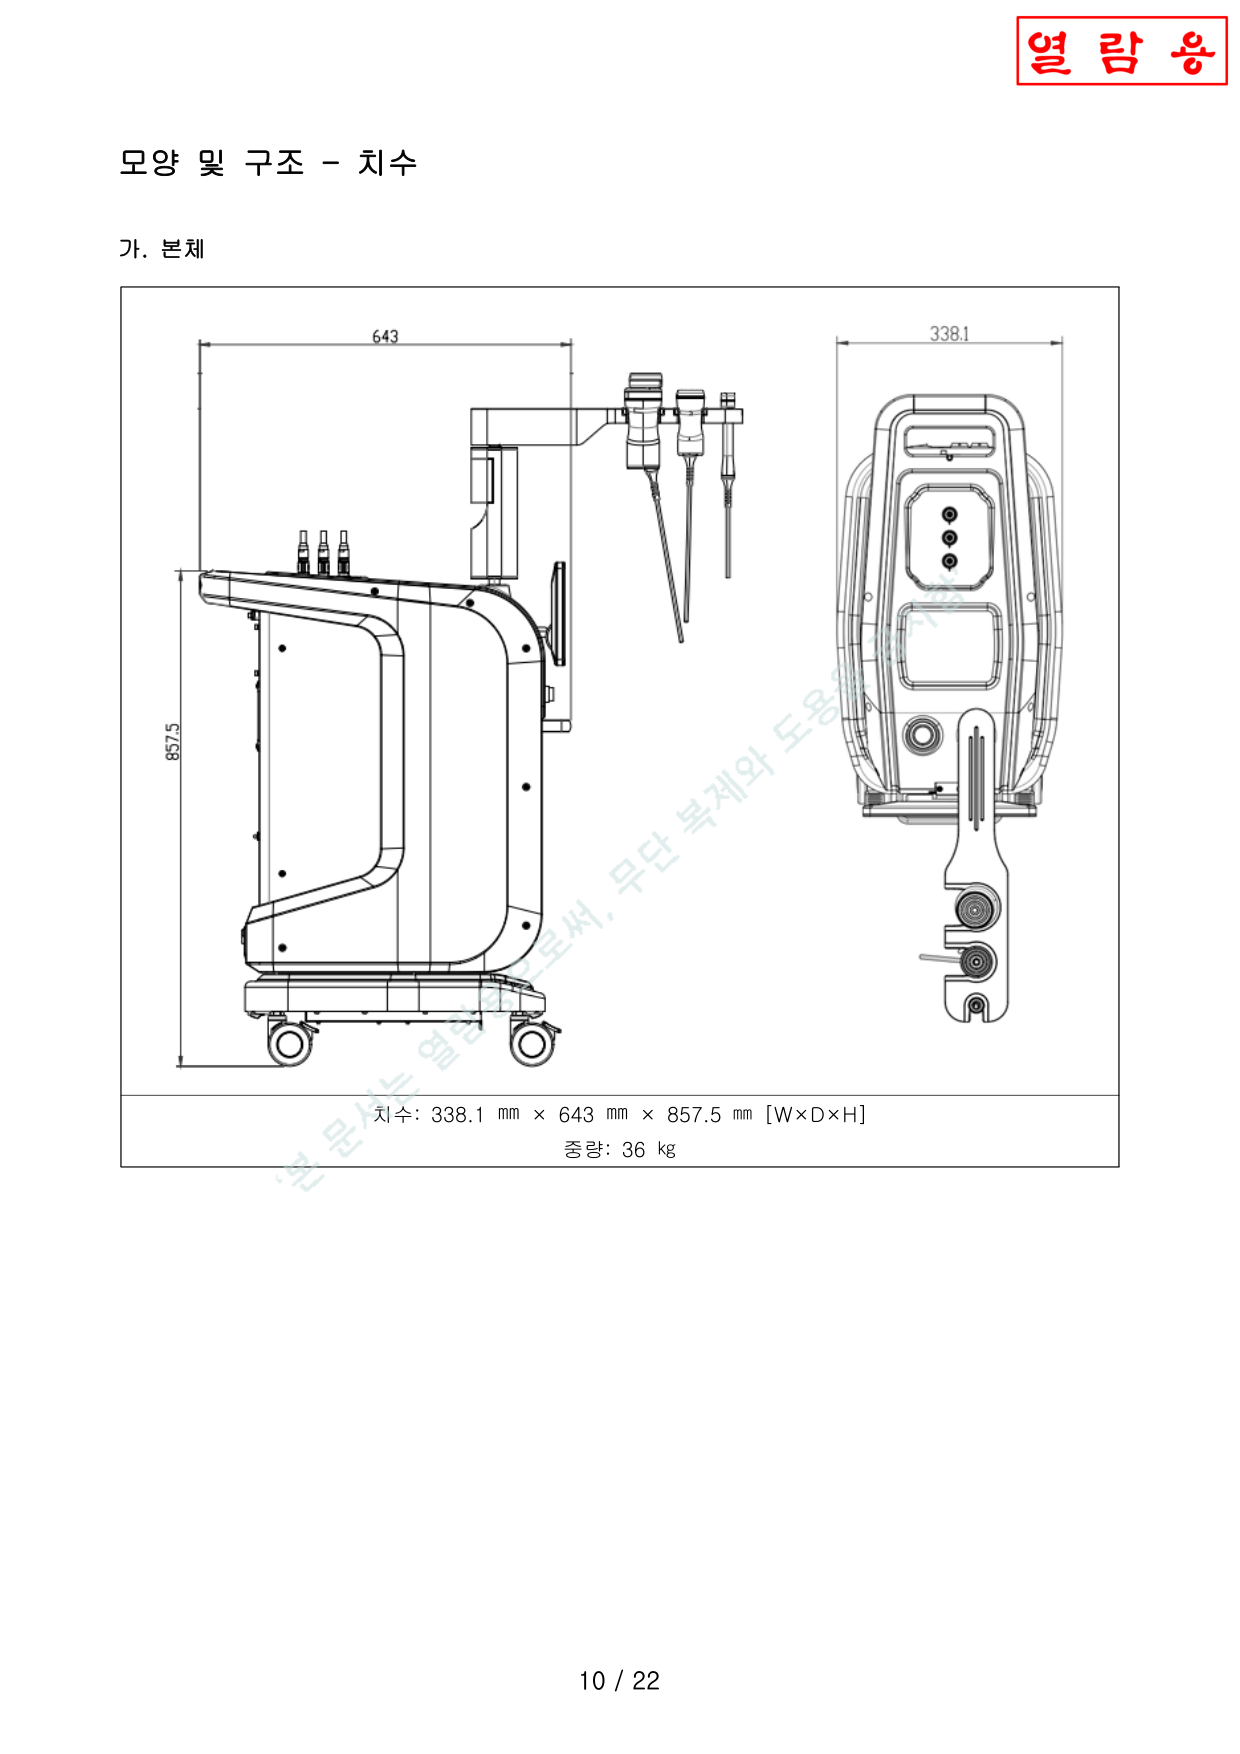
Main Unit본체
| Dimensions (W×D×H)치수 | 338.1 × 643 × 857.5 mm |
| Weight중량 | 36 kg |
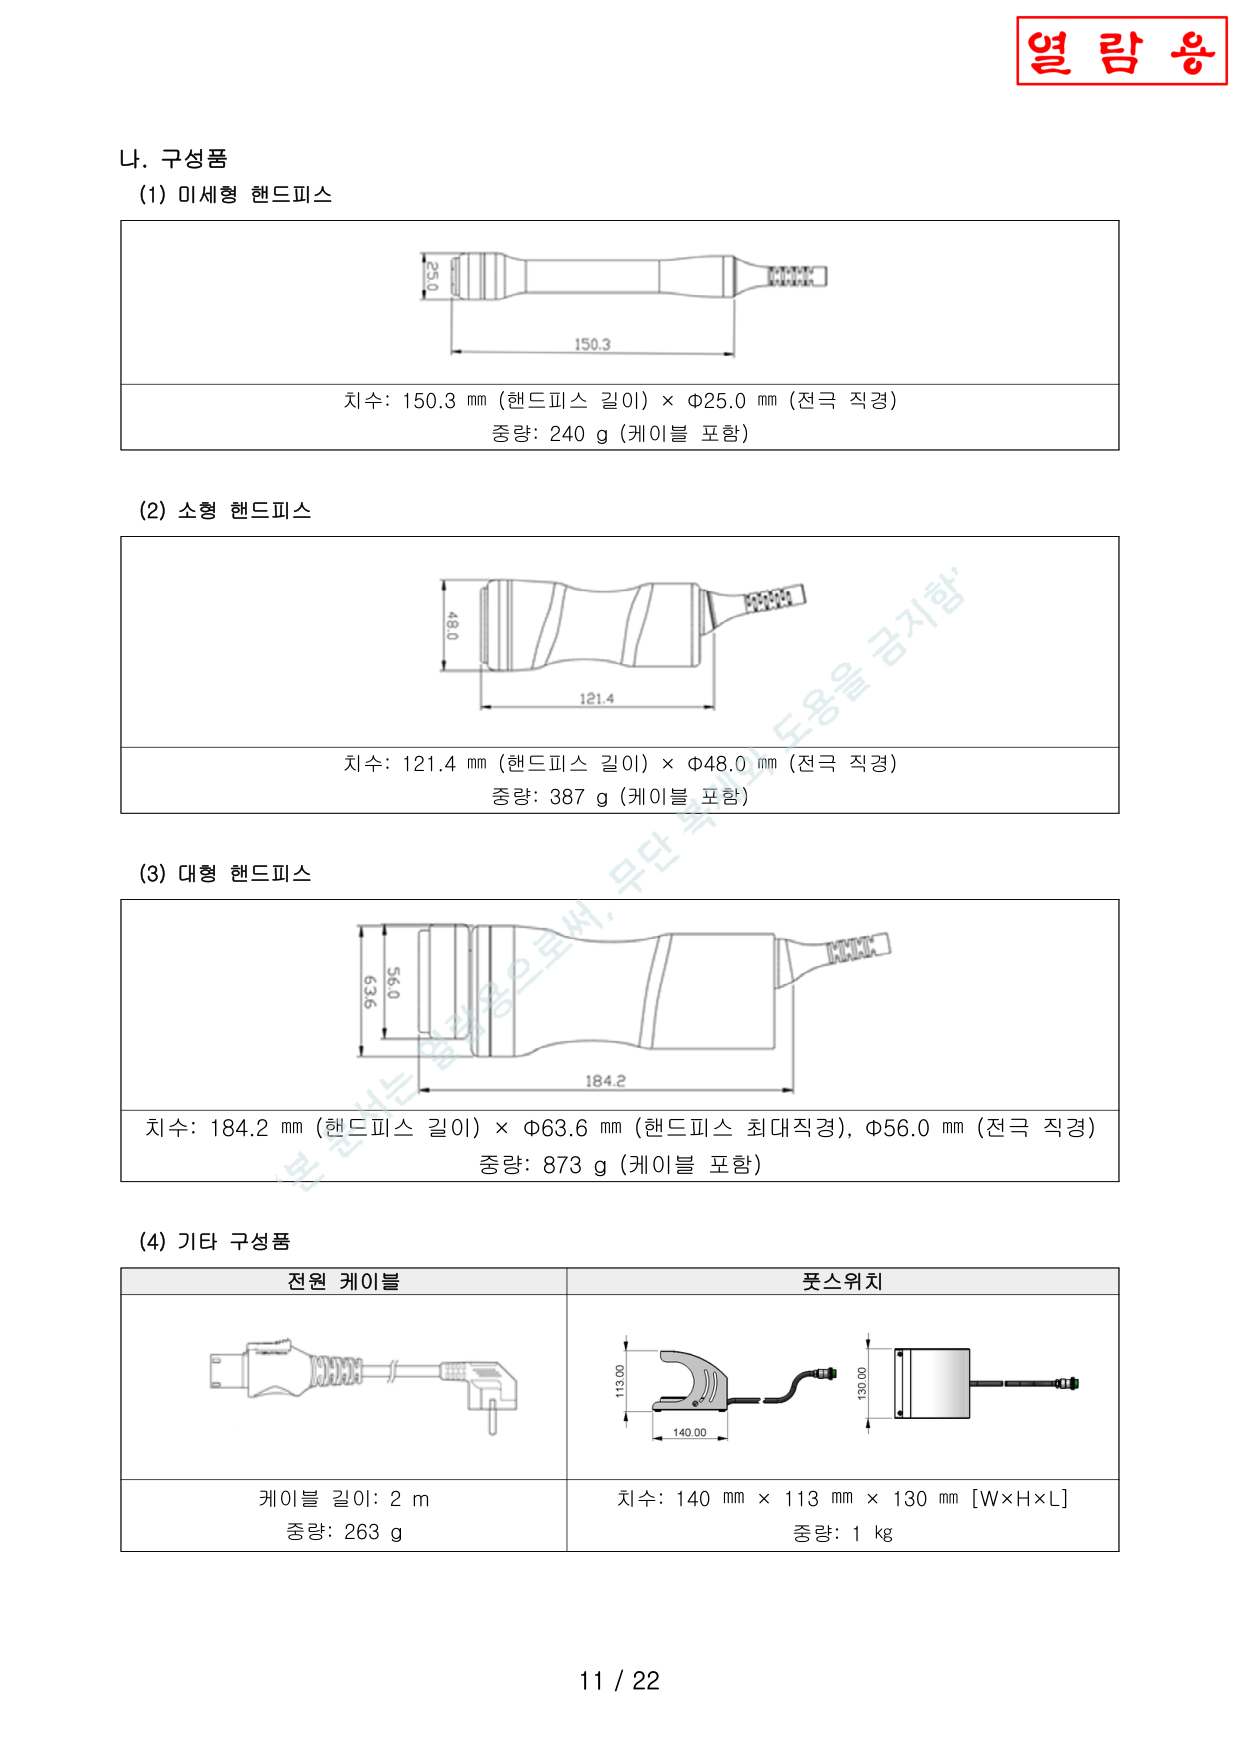
Handpieces핸드피스
| Component구성품 | Dimensions치수 | Weight중량 |
|---|---|---|
| Periorbital미세형 | 150.3 mm × Φ25.0 mm | 240 g |
| Facial소형 | 121.4 mm × Φ48.0 mm | 387 g |
| Body대형 | 184.2 mm × Φ63.6 mm (max) | 873 g |
Accessories기타
| Power Cable전원 케이블 | 2 m, 263 g |
| Foot Switch풋스위치 | 140 × 113 × 130 mm, 1 kg |
Electrical Characteristics전기적 특성
Ratings & Safety정격 및 안전장치
| Electrical Rating전기적 정격 | 100-240 VAC, 50/60 Hz, 200 VA |
| Protection보호형식 | Class I, Type BF1급기기, BF형기기 |
Safety Devices안전장치
- FUSE — Protects circuitry when voltage/current exceeds rated values정격 이상 전압/전류 시 회로 보호
- Program Watchdog — Turns off all outputs on CPU/firmware malfunctionCPU/FW 이상 시 모든 출력 OFF
- Handpiece Interlock — Cannot operate simultaneously핸드피스 인터록 — 동시 작동 불가
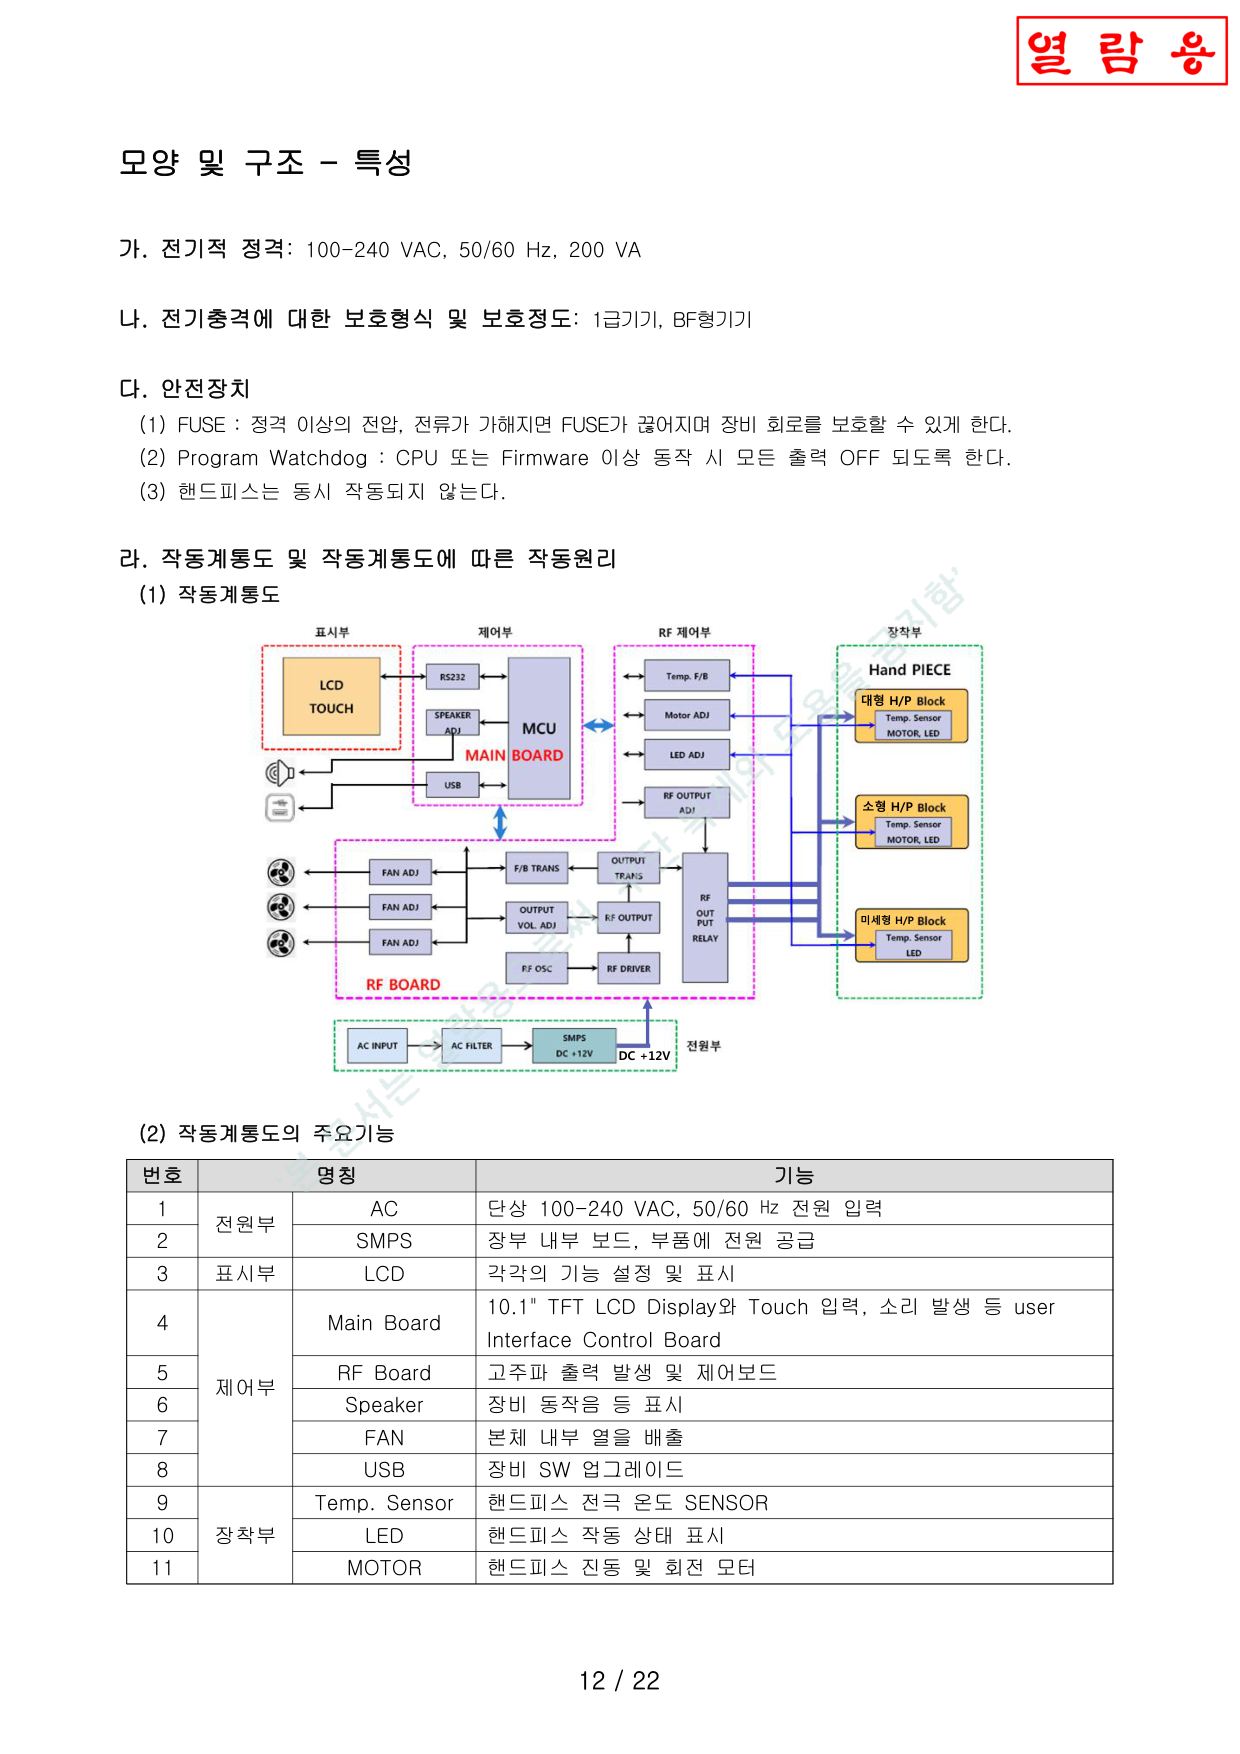
Block Diagram — Key Components작동계통도 — 주요기능
| No. | Name명칭 | Function기능 |
|---|---|---|
| 1 | AC Power | 100-240 VAC, 50/60 Hz |
| 2 | SMPS | Power supply for boards/components보드 및 부품 전원 공급 |
| 3 | LCD | 10.1" TFT LCD Display |
| 4 | Main Board | UI Control — touch, soundUI 제어 — 터치, 소리 |
| 5 | RF Board | RF output generation & control고주파 출력 발생 및 제어 |
| 6 | Speaker | Operation sound동작음 |
| 7 | FAN (×3) | Internal heat dissipation내부 열 배출 |
| 8 | USB | S/W upgrade portSW 업그레이드 |
| 9 | Temp. Sensor | Electrode temperature전극 온도 센서 |
| 10 | LED | Handpiece status핸드피스 상태 표시 |
| 11 | MOTOR | Vibration & rotation진동 및 회전 모터 |
Operating Principle작동원리
AC power → SMPS (DC conversion) → RF Board (power) → Main Board (MCU control, LCD display) → User sets parameters on LCD → Presses foot switch → RF Board generates configured output → Delivered through handpiece electrode.AC 전원 → SMPS (DC 변환) → RF BOARD (전원 인가) → MAIN BOARD (MCU 제어, LCD 표시) → 사용자가 LCD에서 출력값 설정 → 풋스위치 누름 → RF BOARD가 설정된 출력 발생 → 핸드피스 전극을 통해 출력.
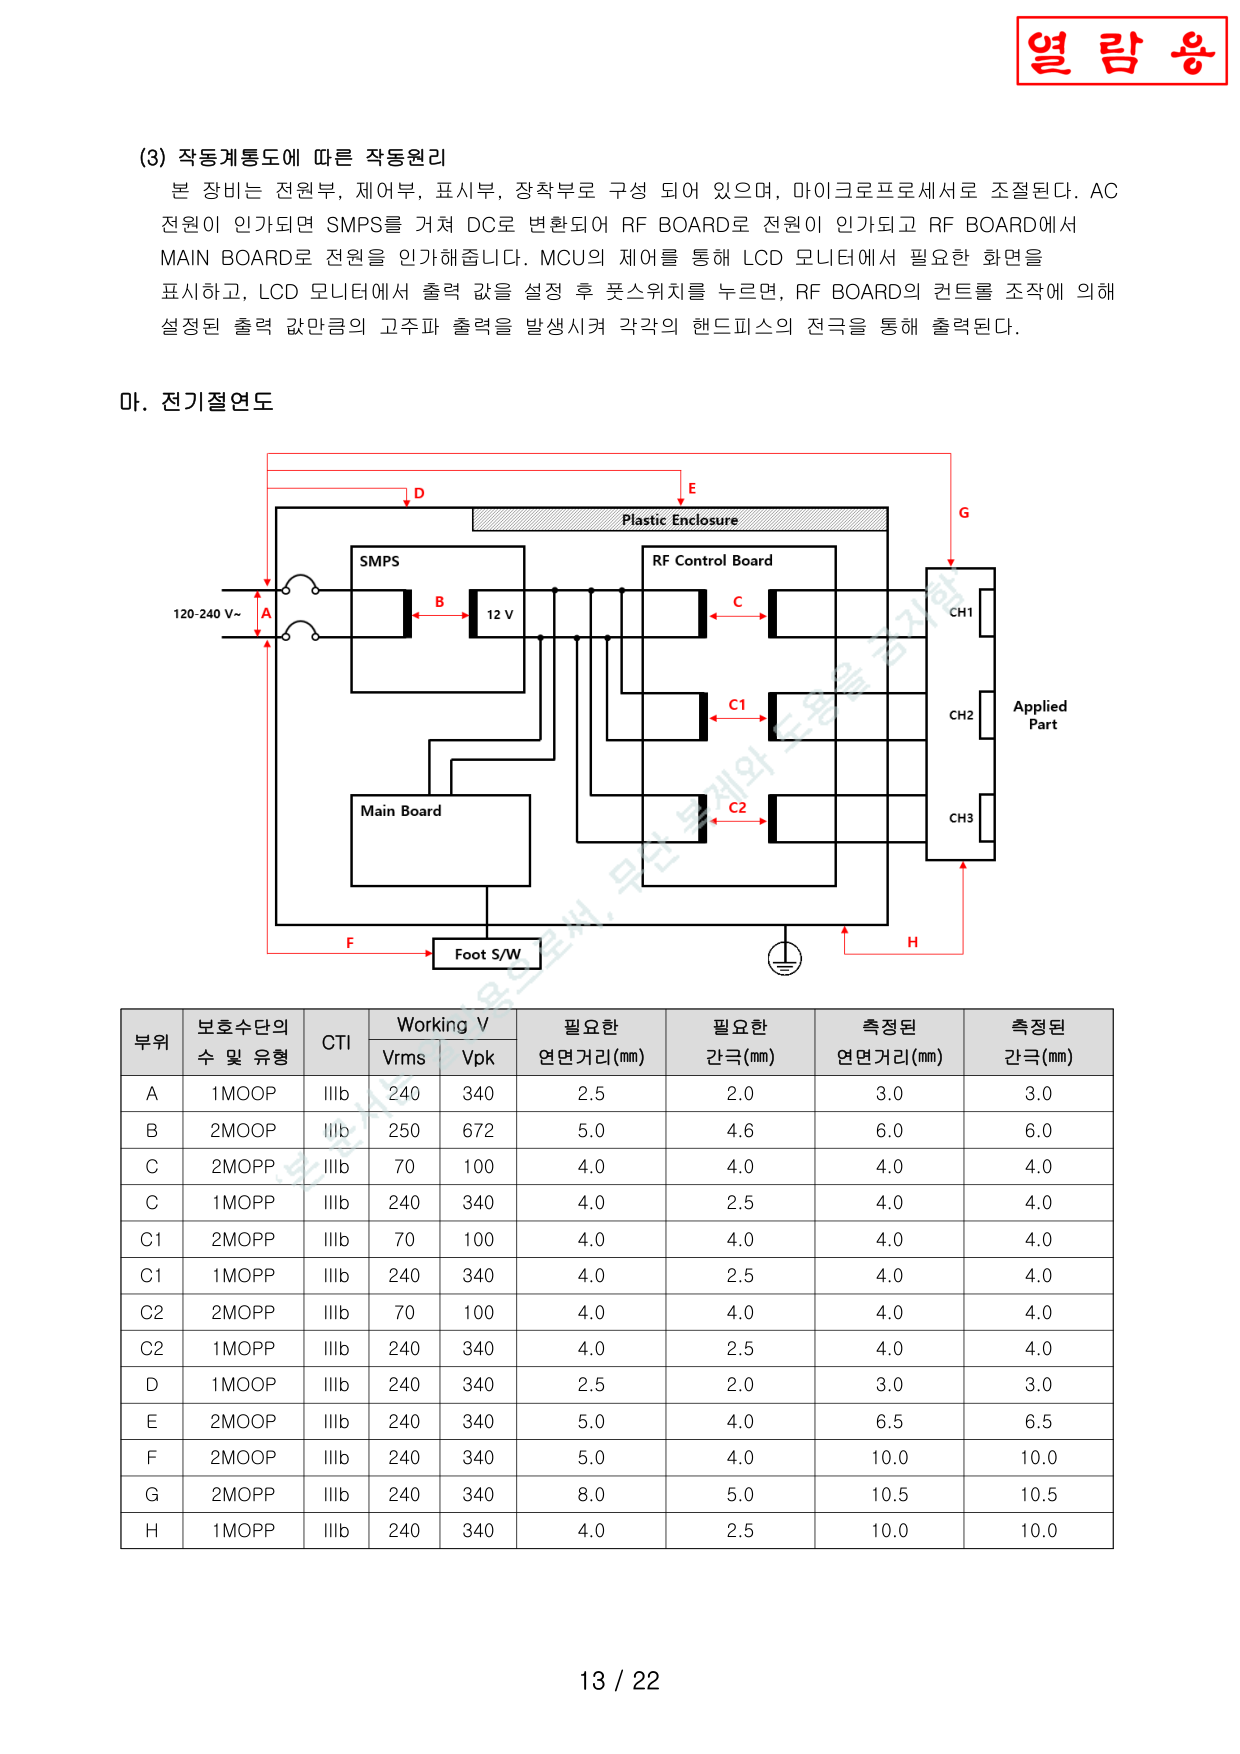
Insulation Diagram전기절연도
Shows insulation barriers between mains power, protective earth, and applied parts (Type BF). Double insulation between primary and secondary circuits.상용전원, 보호접지, 장착부(BF형) 간 절연 구조 도시. 1차/2차 회로 간 이중 절연.
Software Structure소프트웨어 구조
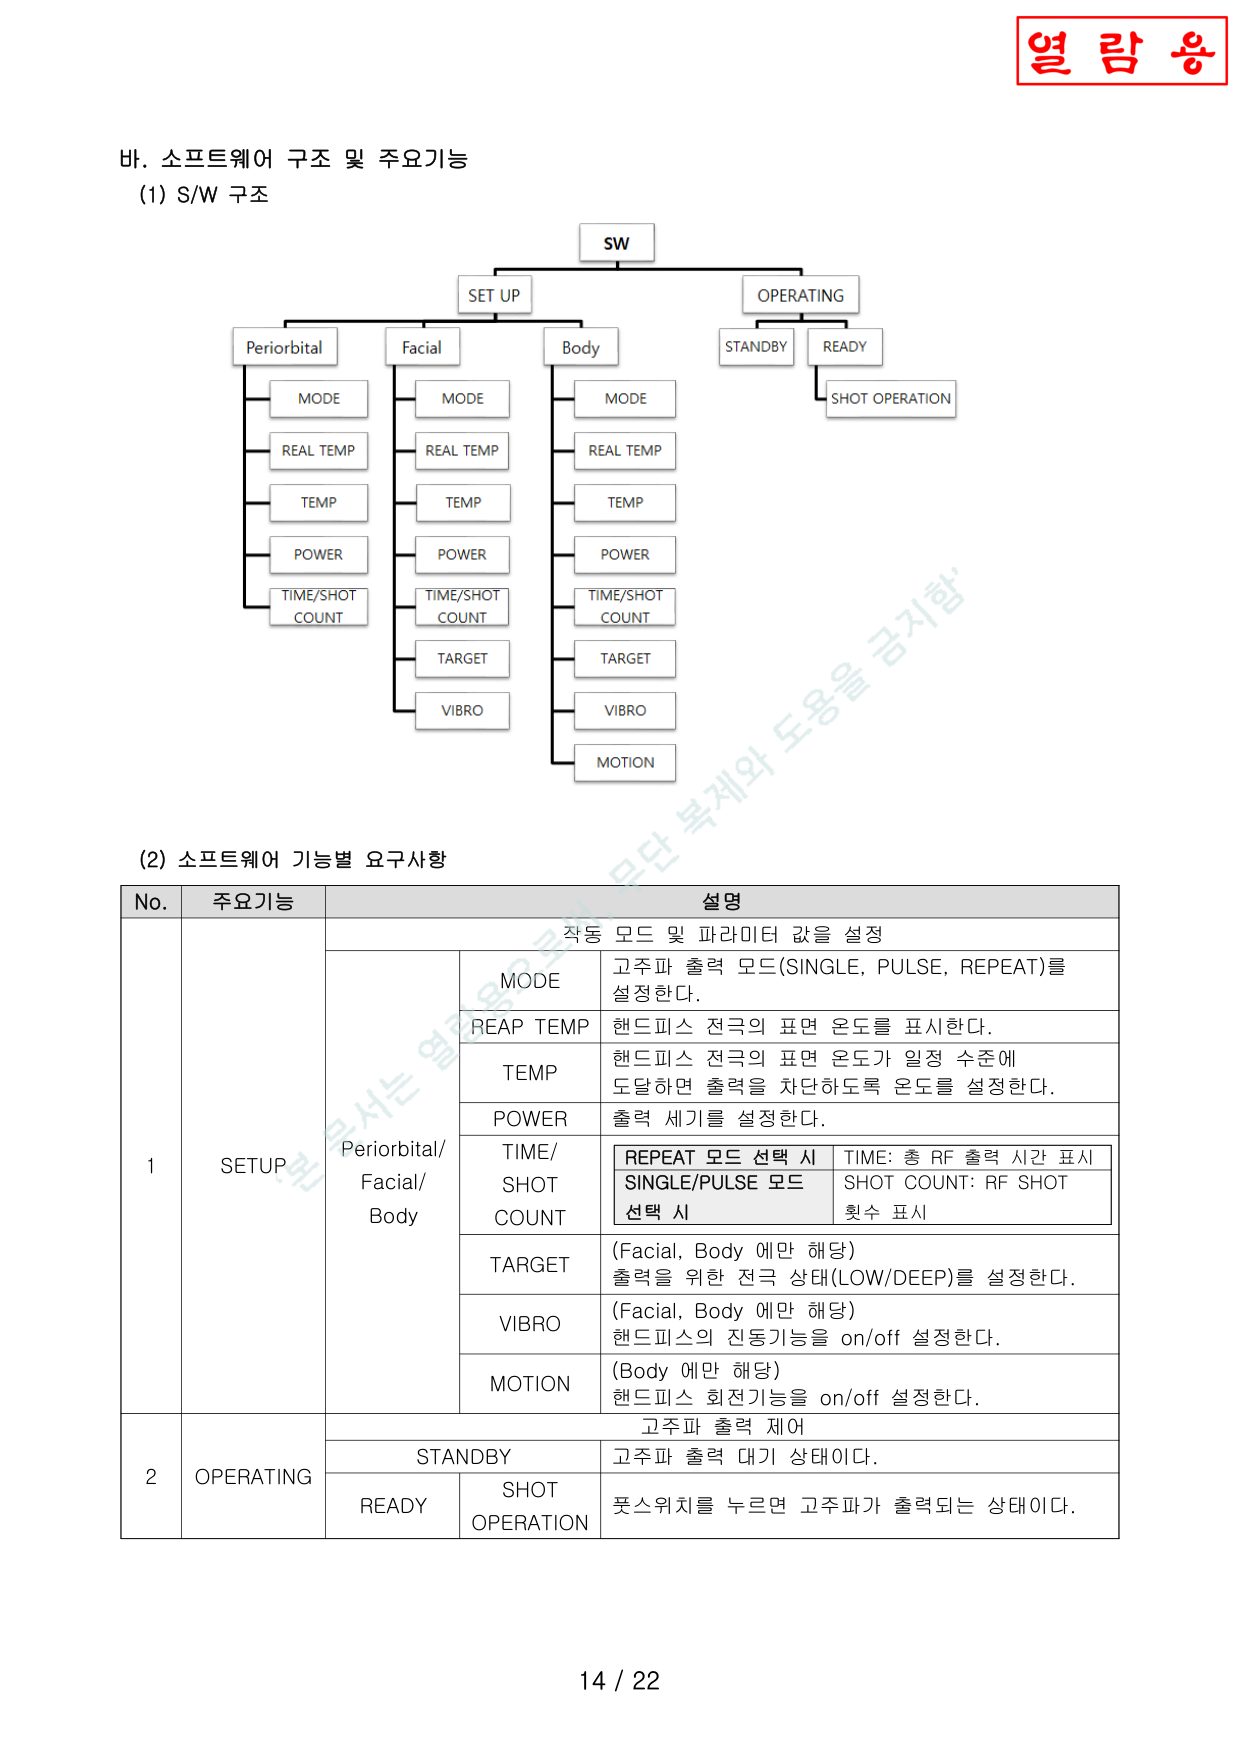
Software Functional Requirements소프트웨어 기능별 요구사항
| Function기능 | Parameter파라미터 | Description설명 |
|---|---|---|
| SETUP | MODE | SINGLE / PULSE / REPEATSINGLE / PULSE / REPEAT 설정 |
| REAL TEMP | Display electrode temperature전극 온도 표시 | |
| TEMP | Set cutoff threshold차단 온도 설정 | |
| POWER | Output power level출력 세기 설정 | |
| TIME / SHOT | REPEAT: time, SINGLE/PULSE: countREPEAT: 시간, SINGLE/PULSE: 횟수 | |
| TARGET | LOW / DEEP (Facial, Body)LOW / DEEP (소형, 대형) | |
| VIBRO | Vibration (Facial, Body)진동 (소형, 대형) | |
| MOTION | Rotation (Body only)회전 (대형만) | |
| OPERATING | STANDBY | RF output standby고주파 대기 |
| READY → SHOT | RF output on foot switch풋스위치 누르면 출력 |
Raw Materials (19 Components)원재료 (19종)
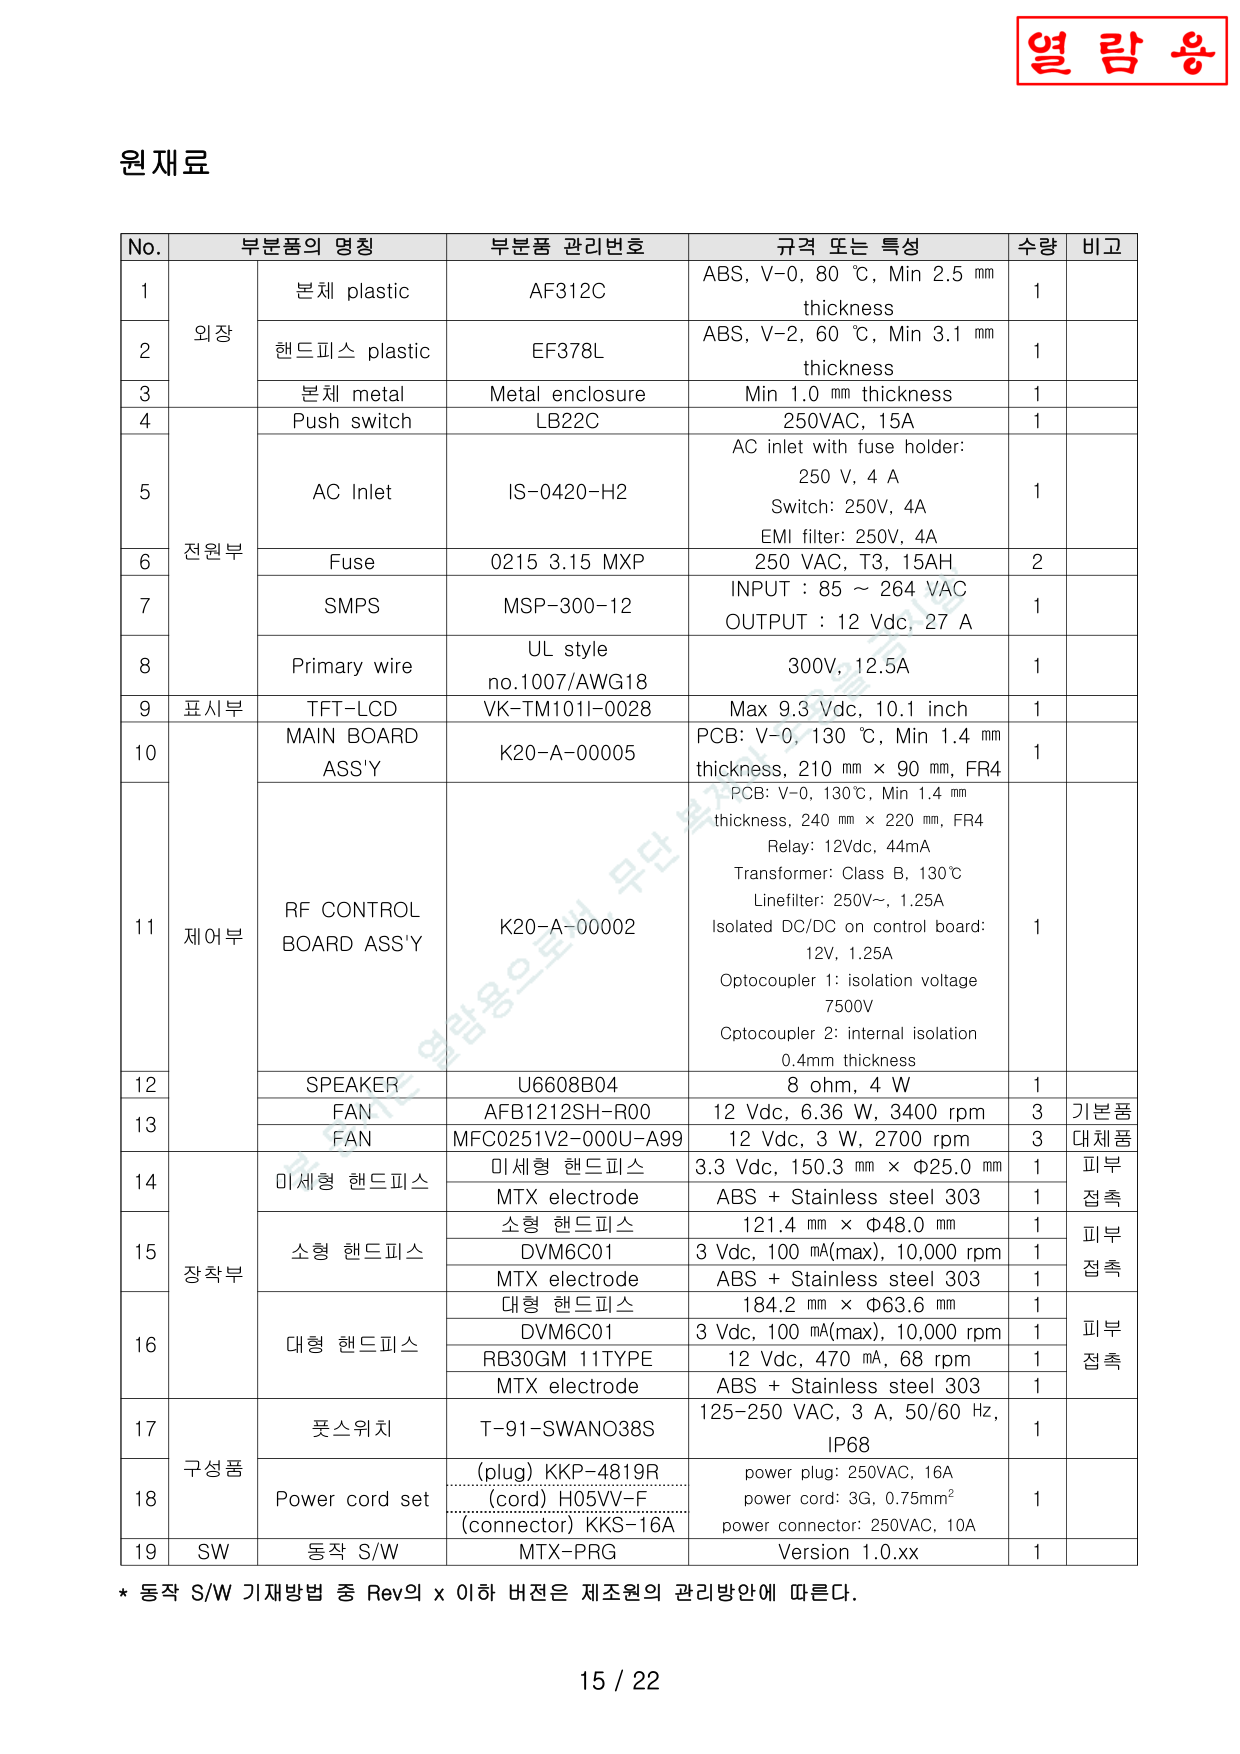
| No. | Component부분품 | Specification규격 |
|---|---|---|
| 1 | Body plastic본체 plastic | ABS, V-0, 80°C, 2.5 mm |
| 2 | HP plasticHP plastic | ABS, V-2, 60°C, 3.1 mm |
| 3 | Metal enclosure본체 metal | Min 1.0 mm |
| 4 | Push switch | 250 VAC, 15 A |
| 5 | AC Inlet | 250 V, 4 A + EMI filter |
| 6 | Fuse | 250 VAC, T3.15AH |
| 7 | SMPS | 85-264 VAC → 12 Vdc 27 A |
| 8 | Primary wire1차 배선 | UL1007/AWG18, 300 V |
| 9 | TFT-LCD | 10.1", Max 9.3 Vdc |
| 10 | Main Board | PCB V-0, FR4, 210×90 mm |
| 11 | RF Board | PCB V-0, FR4, 240×220 mm |
| 12 | Speaker | 8 Ω, 4 W |
| 13 | FAN (×3) | 12 Vdc, 3400 rpm |
| 14 | Periorbital HP미세형 HP | 3.3 Vdc, Φ25 mm, ABS+SS303 |
| 15 | Facial HP소형 HP | Φ48 mm, Motor 3 Vdc, ABS+SS303 |
| 16 | Body HP대형 HP | Φ63.6 mm, Vibro+Rotation, ABS+SS303 |
| 17 | Foot switch풋스위치 | 125-250 VAC, 3 A, IP68 |
| 18 | Power cord전원 코드 | 250 VAC 16 A, 3G 0.75 mm² |
| 19 | Operating S/W동작 S/W | MTX-PRG v1.0.xx |
Usage Instructions사용방법

A. Pre-Use Checklist가. 사용 전 확인사항
- Read the user manual thoroughly before use.사용설명서를 자세히 읽고 사용한다.
- This device must only be used by a licensed physician.해당 장비는 반드시 의사가 사용해야 한다.
- Do not connect power with wet hands.젖은 손으로 전원을 연결하지 말 것.
- Verify electrical specifications match the device ratings.설치장소의 전기적 규격과 장비 규격을 확인한다.
- Do not install in wet/humid locations.물, 습기가 많은 장소에 설치하지 않는다.
- Perform pre-operation inspection.사전 검사를 통해 정상작동 확인.
- Place on a stable, flat surface.안정적이고 평탄한 곳에 설치.
- Check electrode for contamination or foreign materials.전극 출력부 오염/이물질 확인.
- Verify automatic shutoff works properly at maximum temperature.가기를 자동차단 최대온도로 동작하는지 확인한다.
- Verify automatic shutoff resets when temperature returns to normal.가기를 자동차단 온도가 해제 시 원상복구 동작하는지 확인한다.
B. Setup & Power On나. 구성품 연결 및 장비 전원 ON
- Connect foot switch cable to rear connector.풋스위치 케이블을 후면 커넥터에 연결.
- Connect power cable to rear power inlet.전원 케이블을 후면 전원 인렛에 연결.
- Mount handpiece holder and wire hanger vertically on top panel.핸드피스 거치대 및 와이어 행거를 윗면 장착부에 수직으로 고정.

B. Setup (continued)나. 구성품 연결 (계속)
- Connect handpieces vertically to top panel connectors (Left: Periorbital, Center: Facial, Right: Body).핸드피스를 윗면 커넥터에 수직으로 연결 (좌: 미세형, 중: 소형, 우: 대형).
- Press front power push switch to turn ON.본체 정면의 전원 push 스위치를 이용하여 전원을 ON 한다.
C. Operation다. 사용방법
- After power ON, use push switch to turn on, then select Treatment Mode or Information mode icon.전원 push 스위치를 이용하여 장비 전원을 ON한다. 작동모드(Treatment Mode) 아이콘 또는 Information 모드 아이콘을 선택한다.
| No. | Icon아이콘 |
|---|---|
| ① | Periorbital handpiece Treatment Mode icon미세형 핸드피스 작동모드 진입 아이콘 |
| ② | Facial handpiece Treatment Mode icon소형 핸드피스 작동모드 진입 아이콘 |
| ③ | Body handpiece Treatment Mode icon대형 핸드피스 작동모드 진입 아이콘 |
| ④ | Information Mode iconInformation 모드 전환용 아이콘 |

C. Operation Mode Details다. 작동모드 동작 상세
- Select Treatment Mode icon for the handpiece in use. SINGLE PULSE / REPEAT mode display appears.핸드피스에 맞는 작동모드(Treatment Mode) 아이콘 선택 시, 아래 화면으로 전환됩니다.
- Set output parameters: TARGET (DEEP/LOW), MODE (SINGLE/PULSE/REPEAT), TEMP (30-50°C), POWER (0-100%), VIBRO, MOTION.출력 파라미터 설정: TARGET, MODE, TEMP (30-50°C), POWER (0-100%), VIBRO, MOTION.
- Press STANDBY → READY. OPERATION indicator appears on screen.STANDBY → READY 전환. 화면에 OPERATION 표시 나타남.
- Place electrode on treatment area, press foot switch. Move handpiece continuously in circular or linear motions.전극을 시술 부위에 위치시키고 풋스위치를 누릅니다. 핸드피스를 원 또는 선을 그리듯이 지속적으로 이동.
- Save frequent settings with PRESET (up to 5).자주 쓰는 파라미터는 PRESET으로 5개까지 저장 가능.
- When done, press HOME to return to main screen.시술 완료 후 HOME 버튼으로 메인화면 복귀.
| 30 ~ 42°C | ≤ 60 minutes60분 이내 |
| 43 ~ 50°C | ≤ 4 minutes (auto-cutoff at 50°C when RF SHOT expires)4분 이내 (50°C에서 RF 출력 카운트 만료 시 자동 차단) |
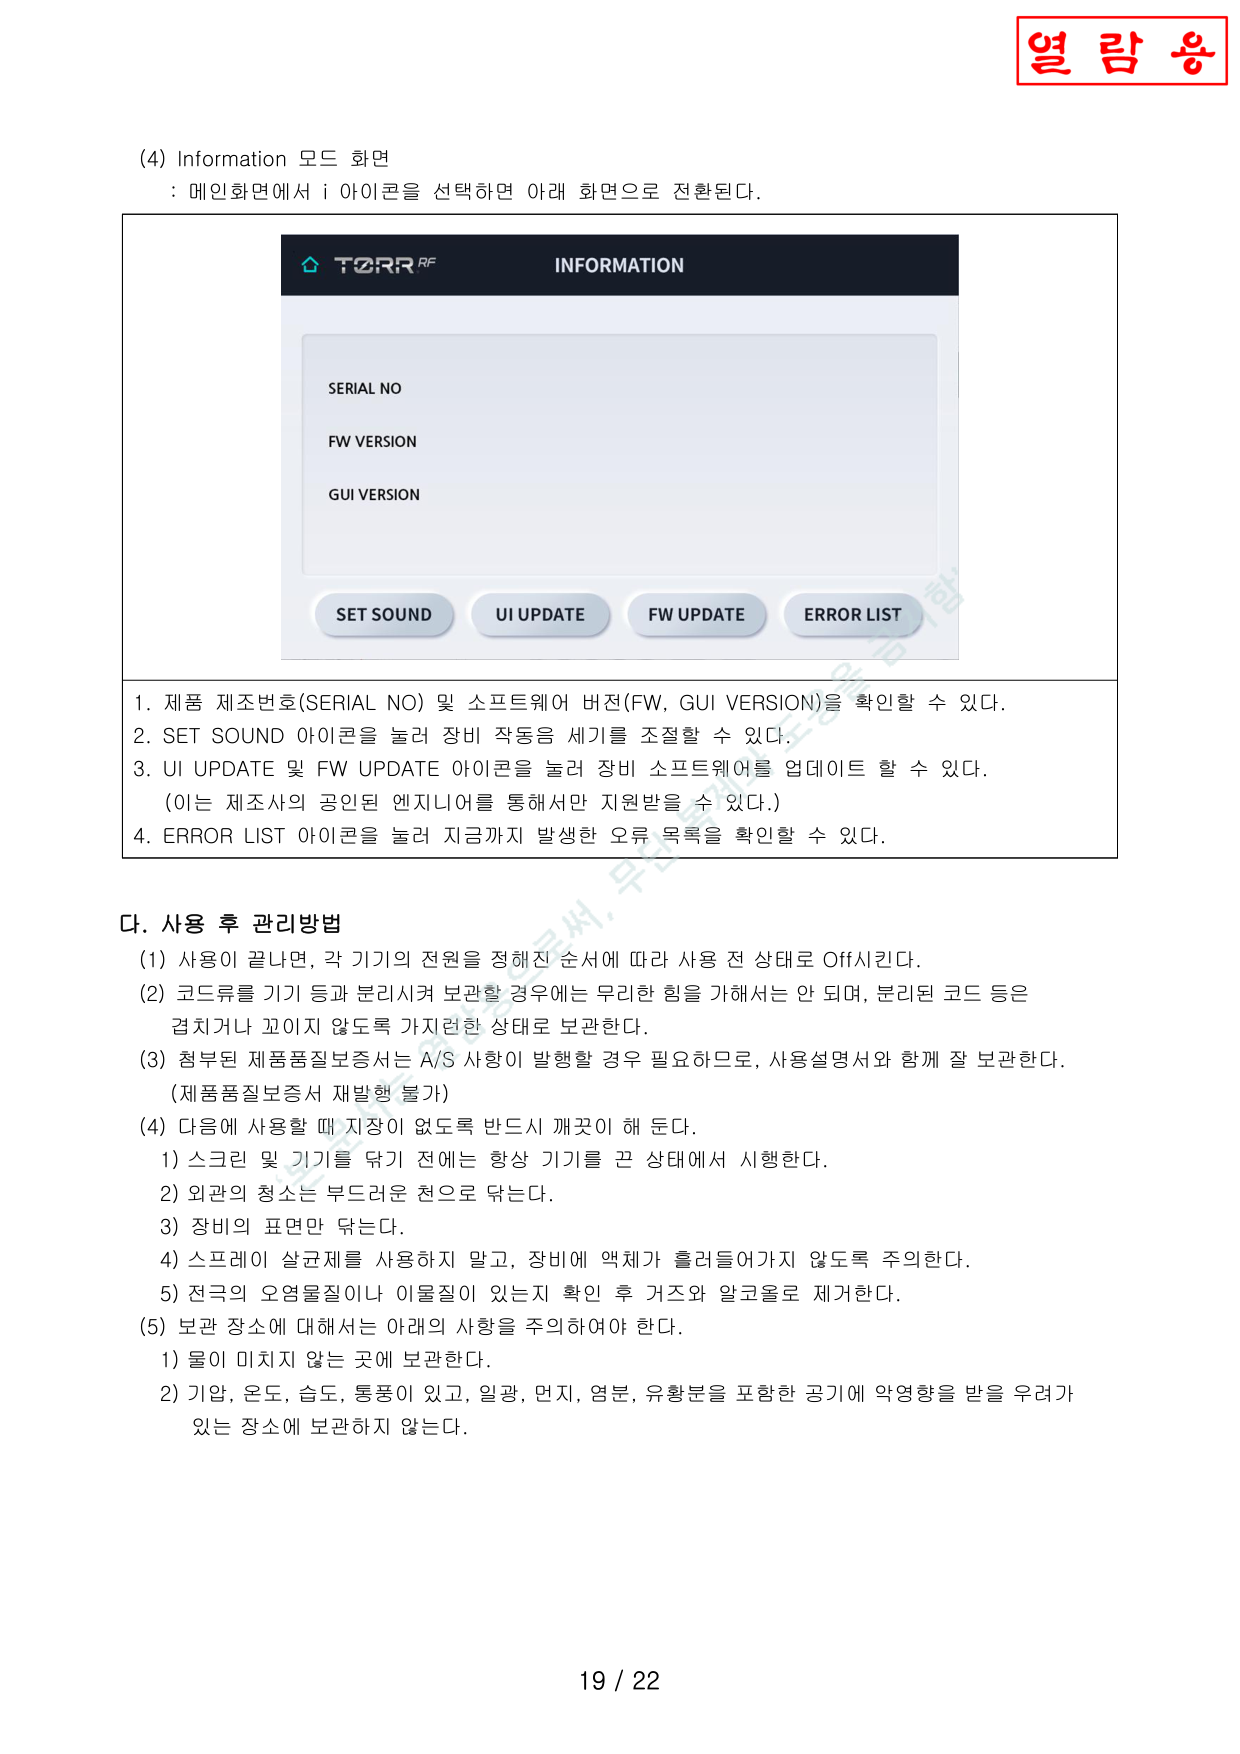
Information ModeInformation 모드 동작
- Displays SERIAL NO and software/GUI versions (FW, GUI VERSION).SERIAL NO 및 소프트웨어/GUI 버전(FW, GUI VERSION)을 표시 가능.
- SET SOUND: adjust operation sound volume.SET SOUND: 이이콘을 터치하여 세기를 조정 가능.
- UI UPDATE & FW UPDATE: authorized engineer only. Do not press — may cause malfunction.UI UPDATE 및 FW UPDATE: 공인 엔지니어 전용. 임의 터치 시 오작동 가능.
- ERROR LIST: view recorded error codes.ERROR LIST: 오류목록 기록된 것을 확인할 수 있음.
D. Post-Use Care다. 사용 후 관리방법
- After use, power off the device. Do not pull handpiece cable forcefully.사용 끝나면, 전원을 끈다. 핸드피스 케이블을 억지로 빼지 마시오.
- Store power cord and handpiece cables without tangles or excessive bending.전원 코드 및 핸드피스 케이블은 꼬이지 않게 보관한다.
- Clean exterior with soft cloth (power off first). Clean electrode with gauze + alcohol.외관은 부드러운 천으로 닦기 (전원 Off 상태). 전극은 거즈+알코올 세척.
- Store away from water, high humidity, dust, direct sunlight. Recommended storage: 1) No moisture; 2) Well-ventilated; 3) No dust/corrosive gas; 4) Stable surface without vibration.보관 시: 1) 물이 묻지 않는 곳; 2) 환기, 통풍 양호; 3) 먼지·부식성 가스 없는 곳; 4) 흔들림 없는 안정된 장소.
Precautions사용시 주의사항
A. Environmental Conditions가. 사용 환경 조건
| Temperature온도 | 0 ~ 40°C |
| Relative Humidity상대습도 | 10 ~ 75% |
| Pressure기압 | 800 ~ 1060 hPa |
CONTRAINDICATED Patient Contraindications나. 환자 금기사항
- Patients with implanted pacemakers or other implantable devices심장박동기 또는 기타 이식형 기기 이식 환자
- Pregnant or breastfeeding patients임산부 또는 모유 수유 중인 환자
- Patients with metallic prosthetics in treatment area환부에 금속 보철 장치가 있는 환자
- Undiagnosed skin lesions진단이 내려지지 않은 피부 병변
- Skin cancer or cancer history피부암 또는 암 병력
- Active lesions: ulcers, psoriasis, eczema, rash, etc.현재 진행 중인 병변 (궤양, 건선, 습진, 발진 등)
- Heat-sensitive patients or patients with lesions in treatment area열감에 민감하거나 환부에 병변이 있는 환자
- Immunosuppressed patients면역 억제 질환/면역 체계 장애 환자
C. General Precautions — Before Use다. 일반 주의사항 — 사용 전
- Read manual thoroughly.사용설명서 숙독 필수.
- Physician use only.의사만 사용 가능.
- No wet hands for power connection.젖은 손으로 전원 연결 금지.
- No water/liquid on main unit — fire/shock risk.본체에 물/액체 금지 — 화재/감전 위험.
- No wet/humid installation location — fire/shock risk.습기 많은 장소 설치 금지 — 화재/감전 위험.
- Do not press power cord with sharp/heavy objects.전원 코드를 날카로운/무거운 물건으로 누르지 않을 것.
- No flammable materials nearby.가연성 물질 가까이에서 사용 금지.
- Never disassemble or modify — authorized technicians only.제조사 자격 기술자 외 분해/개조 절대 금지.
- Use only original accessories provided with this device.본 장비에 제공된 케이블 및 액세서리만 사용.
- Do not bend connector cable excessively — may cause malfunction.커넥터 케이블을 과도하게 꺾지 않을 것. 고장의 원인.
- Verify device is set to lowest power before treatment.시술 전 장비가 최소 출력으로 설정되어 있는지 확인.
- Do not connect handpieces with grounded objects contacting patient.핸드피스는 환자가 접지물에 접촉된 상태에서 연결 금지.
- Inspect handpiece surface for damage before use.사전 검사 시 핸드피스 표면 손상 여부 확인.
C. General Precautions — During Use다. 일반 주의사항 — 사용 중
- Clear obstructions; do not block vents.방해물 제거, 통풍구 막지 말 것.
- If malfunction detected, stop immediately and power off.고장 발견 시 즉시 사용 중지 및 전원 Off.
- Power outage: turn off immediately, return components to original position.정전 시 즉시 전원 끄고 구성품 원위치.
- Patient must not contact grounded parts.환자는 접지 부분과 접촉되지 않도록.
- No use near patient monitors. No pregnant persons in same space.환자감시장치 근접 사용 금지. 임산부 같은 공간 금지.
- Keep handpiece in continuous motion while on skin.핸드피스는 피부 위에서 지속적으로 움직일 것.
- Observe burn prevention time limits (30-42°C: ≤60min, 43-50°C: ≤4min).화상방지 사용시간 준수 (30-42°C: 60분 이내, 43-50°C: 4분 이내).
- After treatment, set to STANDBY mode and return handpiece to holder.시술 후 반드시 STANDBY 모드로 전환하고 핸드피스를 거치대에 보관.
After Use & Maintenance사용 후 주의사항 및 보수 관리
- Use manufacturer-specified cleaning methods only. Do not use abrasive/chemical cleaners.제조사가 명시한 세척방법만 사용. 연마제/화학 세정제 금지.
- Regular maintenance must be performed by authorized BRITZMEDI technician.정기 보수 관리는 반드시 브리츠메디 자격 기술자가 시행.
D. Electrosurgical Precautions라. 전기수술기에 관한 주의사항
- No use where flammable anesthetics are present.가연성 마취제 있는 곳에서 사용 금지.
- Keep cotton/gauze wet; keep electrodes away from flammable materials and O₂.솜/거즈는 젖은 상태 보관, 전극은 발화물질/산소 격리.
- High O₂/N₂O environment: reduce concentration first — increased fire risk.고농도 O₂/N₂O 환경에서는 농도를 낮추도록 조치. 화재 위험 증가.
- Ensure flammable materials fully evaporated before use.인화성 물질 완전 증발 후 사용.
- Prevent patient contact with grounded metal parts.환자가 접지 금속에 접촉하지 않도록.
- Place dry gauze between skin folds (e.g., armpits).마른 거즈를 피부 접촉 부위 사이에 삽입 (예: 겨드랑이).
- Pacemaker patients: consult qualified specialist before treatment.심장박동기 환자: 시술 전 자격 있는 전문가와 상담.
- Keep distance from other electrical equipment — EMI risk.다른 전기장비와 충분한 거리 유지 — 전자기 간섭 위험.
- Use only cables and accessories provided with this device.본 장비에 제공된 케이블 및 액세서리만 사용.
- Set parameters in STANDBY mode; start from minimum, increase gradually.Standby 모드에서 파라미터 설정, 최소값부터 점진적으로 증가.
- Device malfunction may cause unintended power increase.장비 고장 시 출력 전력 의도치 않은 증가 가능.
D. Electrosurgical Precautions (continued)라. 전기수술기 주의사항 (계속)
- Verify appropriate energy output before and during use.장비를 사용하기 전 및 사용하는 동안 적절한 에너지로 출력되고 있는지 확인한다.
- When handpiece is pressed against skin, do not stop movement — keep moving continuously.핸드피스는 피부에 밀착시키고 피부에 닿아있는 경우에는 움직임을 멈추지 않도록 한다.